Setting up User Roles
If you have several employees who will be doing different things in the portal, one of the first things you'll want to do before you begin using this portal is to set up or assign a role for each type of user.
You can set up your user roles however you like, but there are six default user roles available in the portal. You don't have to use these roles, but you cannot change or delete them.
- Super user: Someone who has rights to do everything in the portal.
- Transactions user with Credits: Someone who runs transactions (processes payments) and has permission to run credit transactions. For your protection, you should restrict access to the ability to run a credit.
- Transactions user: Someone who runs transactions, but doesn't have permission to run credit transactions.
- Reports user: Someone who needs access to financial reports, but does not process any payments or perform administrative functions.
- Transaction and Customer User: Someone who can run transactions (no credits) and has permission to manage customers.
- Transaction and Customer User with Credits: Someone who can run transactions (process payments) AND has permission to run credit transactions. This user also has permission to manage customers.
To Set Up Custom User Roles
- Navigate to the Users page in the Admin section.
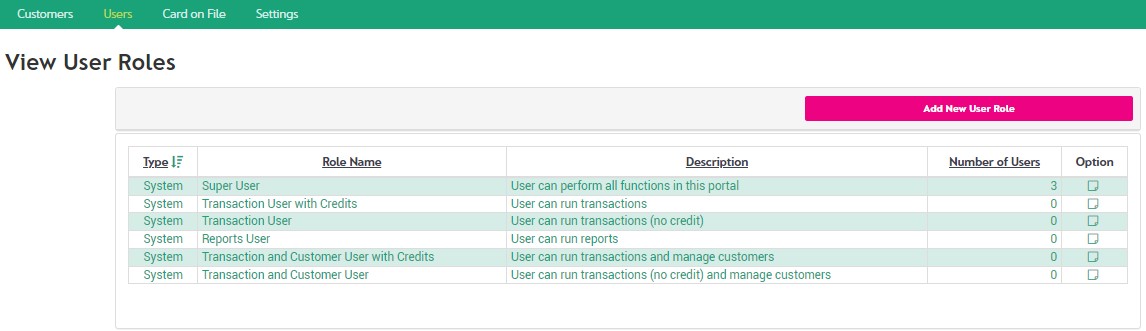
- Click the View User Roles button at the top right.
- The View User Roles page will display, listing all the current user roles that are currently set up for your merchant portal.
- The above list contains only System roles, which are pre-defined user roles that you can choose to use or not. These System roles are not editable, so if you want to pick and choose permissions, you will need to add a Custom role.
- If you want to see the permissions associated with any of the System roles, click on the View icon .
- To add your own custom role, click on the Add New User Role button.
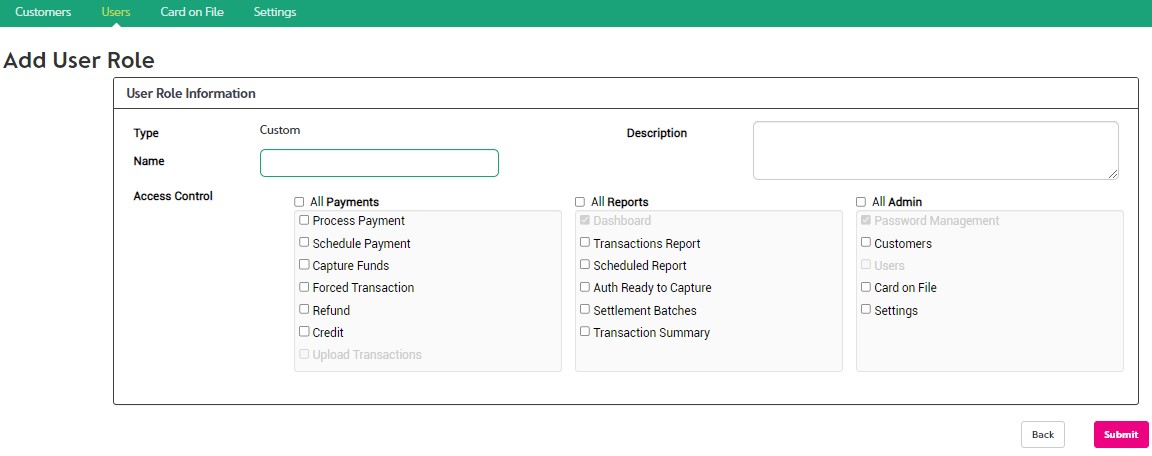
- The Add User Role page will display.
- Enter a Name for the role and an (optional) description, then click the appropriate checkboxes to select the permissions for this user role.
- Once you are finished, click the Submit button.
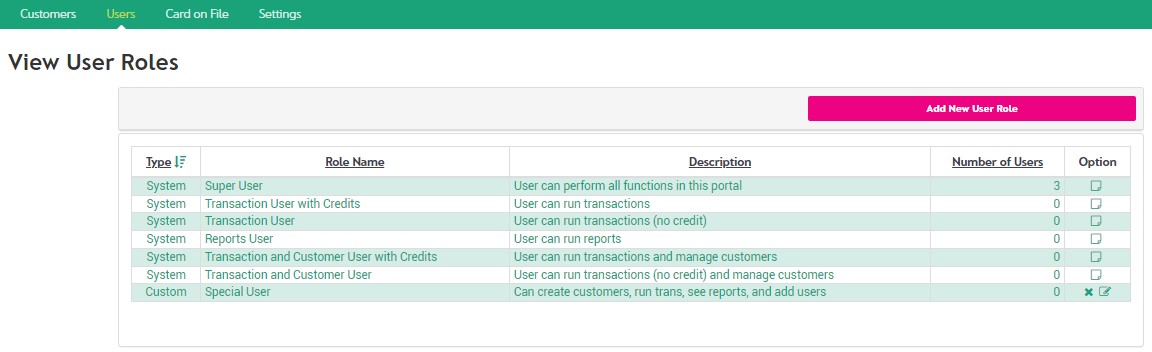
- Once you've submitted your new role, the User Roles page will display, with your new role shown at the bottom of the list. Your new Custom User Role can be Deleted or Edited .
- To update any of the existing Custom roles, click on the associated Edit icon . To delete a role, click the associated Delete icon .
- When making changes to a role, keep in mind that it will affect all users that are currently assigned to that role.
- You will not be able to delete a role that has users assigned to it, so before you try to delete a role, first make sure you reassign a new role to any users with that role.

Managing Users
You can give your employees access to the portal for processing payments, viewing reports, and administering the portal.
Viewing A List Of Users
To see the list of users who have access to your portal:
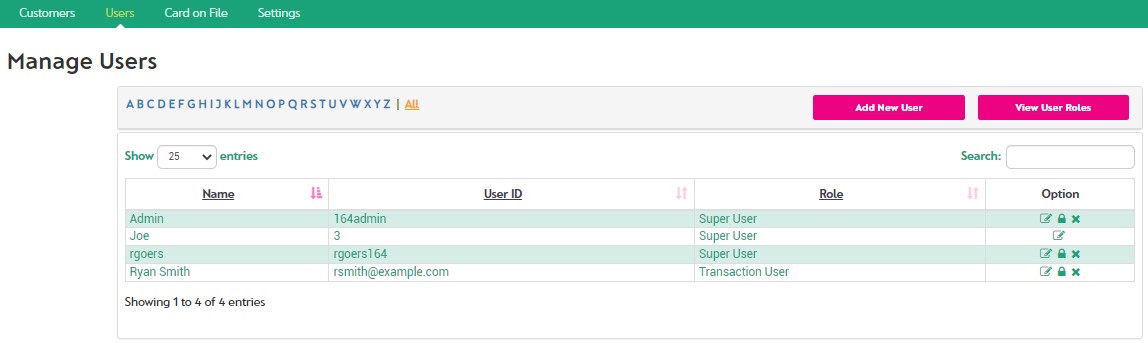
- Navigate to the Users page in the Admin section.
- The list of current users is displayed, showing the Name, User ID, Role and Options that can be performed for that user.
Resetting a Users Password
Agave Support can assist with resetting a password for Super Users, but cannot assist with password resets for non-Super Users.
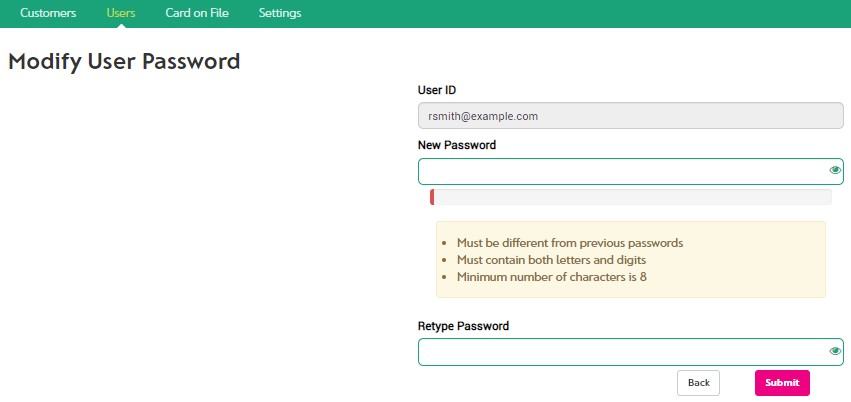
If a user has forgotten their password and they cannot use the Forgot Password function for some reason, the Manage Users page allows you to reset their password.
- On the Manage Users page, note in the Option column the Lock icon .
- Clicking this icon opens the Modify User Password page.
- Enter a new password for the user.
- Provide the new password to the user and make sure to tell them to set a new password of their own once they log in, for security purposes.
Adding A User
To set up a new user in the portal:
- Navigate to the Users page in the Admin section.
- Click on the Add New User button.
- On the New User page, complete all the fields and Save.
-
- The user name can be the persons email address, but it is not required to be an email address.
- Populating the users email address in the Email Address field will ensure that the user can use the Forgot Password function at a later date.
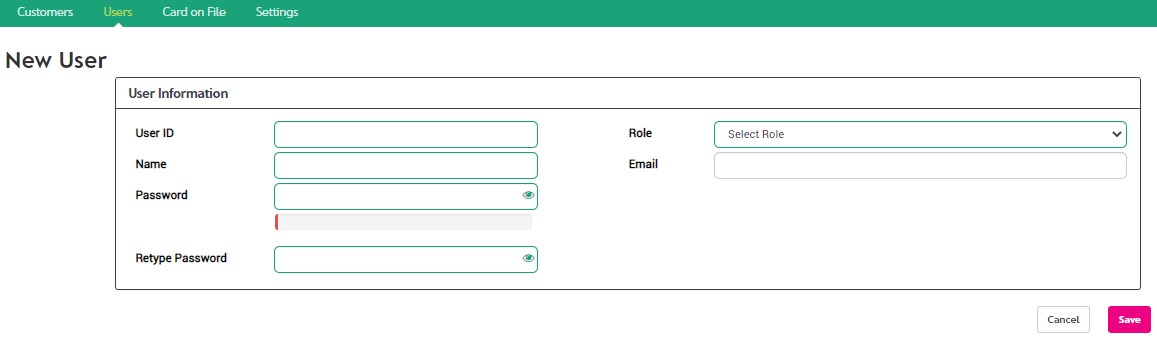
- Choose a User ID for the user by entering a Username in the User ID text entry box. The User ID is the username that the user will enter when logging in.
- Popular User IDs include:
- The user's e-mail address
- The first initial of the user's first name followed by the user's last name
- The user's first name followed by the last name
- Enter the User's full name in the Name entry box.
- Enter a password for the user. While you set the initial password, the user should reset the password to something that only they know when they log in for the first time.
- Re-type the password.
- Select a user role from the dropdown list.
- Enter the users email address (optional).
- Click the Save button.
Changing your Password
To change your password while logged in to the portal:
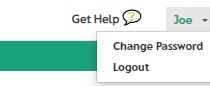
- Click on the Admin drop down at the top right of the screen. From the drop down menu that opens, select Change Password.
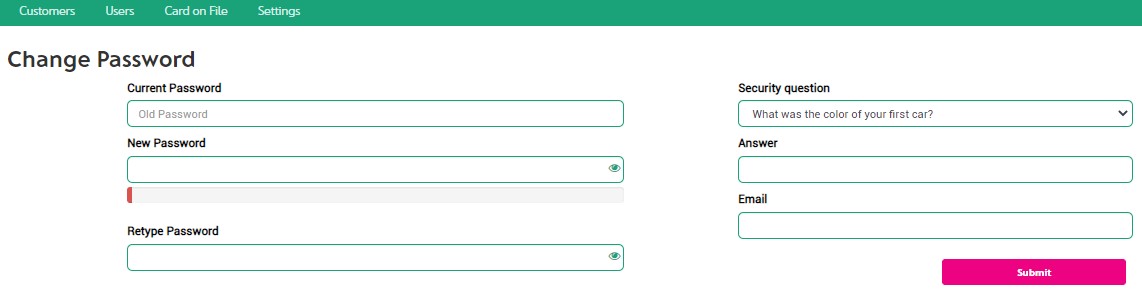
- Enter your current password.
- Enter your new password in the New Password entry box.
- Enter your new password again in the Retype Password entry box.
- Confirm your security question and answer are set.
- Make sure your email address is set - this is required for the Forgot Password function.
- Click Submit to save your changes.
- If the change was successful, the words "Successfully updated" will appear in green on the upper right-hand portion of the screen.
- If an error message appears, try using the tips shown on screen or in the section below when choosing your password or contact Customer Support at:support@paymentsite.com or call us at 855-546-8749, option 2 for Support.
Tips for choosing a strong password
- Use a combination of letters, numbers and special characters. The strongest passwords use a combination of these.
- Make sure your password is at least 8 characters long. Longer passwords are more secure.
- Try replacing a letter with a number in an easy-to-remember word (for example: b4b4eakfast instead of beforebreakfast) or using the first letter of each word in a phrase or sentence (example: SWWPACUW11LA -- Still Wondering Why People Are Coming Up With 11 Letter Acronyms).
- Don't use the same password for lots of different online accounts - if you do, and someone gets your password for one site, they may end up with your password for lots of sites.
- Keeping track of lots of password can be difficult, and Post-Its or keeping notes in a spreadsheet can seem attractive. Consider using a password vault program to help keep track of accounts and passwords. There are a number of good password vault applications available, including many free options. There are online options and also applications that run on your computer. These programs let you store all your accounts and passwords, and you only need to remember one password - the one for your vault.
Password Resets
You can change your password at any time you like. Your password must be different from the last 4 passwords you used.
If you forget your password, you can use the Forgot Password function on the login page. This function requires your account to have a pre-set Security Question and answer, and an email address saved in the system.
If you use an incorrect password more than 5 times in a row, your account will lock for 30 minutes. It will automatically unlock after 30 minutes.
Setting up Customer Custom Fields
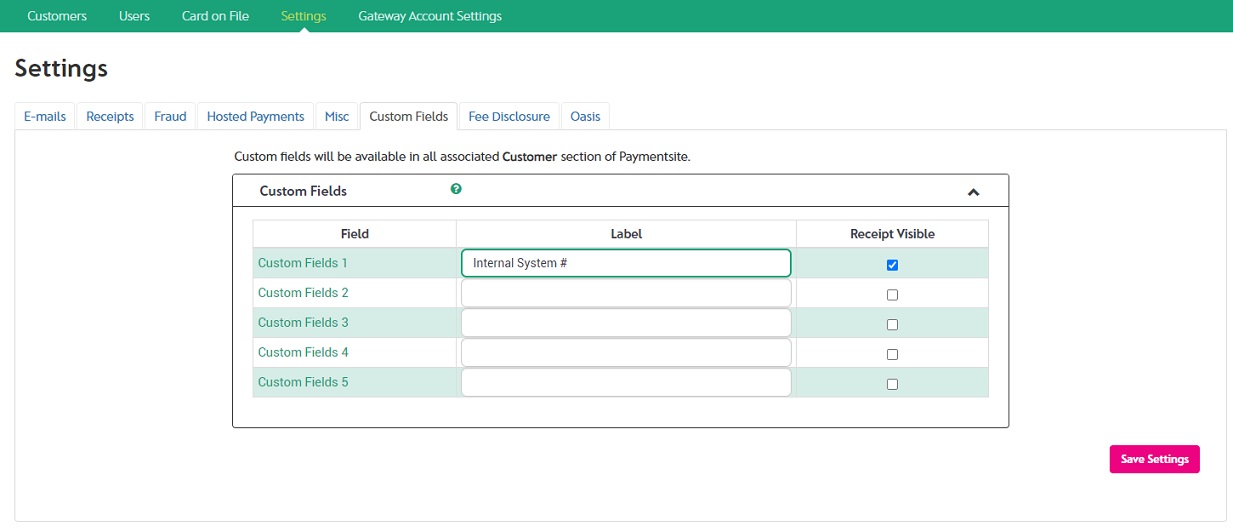
You can set up to five (5) custom fields for Customer profiles in Admin / Settings on the Custom Fields tab of Settings.
- Customer Custom Fields must be activated at the Merchant Level. If you are interested in this feature, please call or email Agave Support and request that this configuration setting be turned on for you.
- Email Agave Support at support@agavepay.com or call us at 855-546-8749, option 2 for Support.
- Customer Custom Fields can be activated by entering a Label next to the Custom Field number. Once a Label is entered, the Custom Field will appear in the Customer Profiles.
- Custom Fields will be listed on the Customer, Card on File, Process Payment, Schedule Payment screens, and can be added to Transaction Reports.
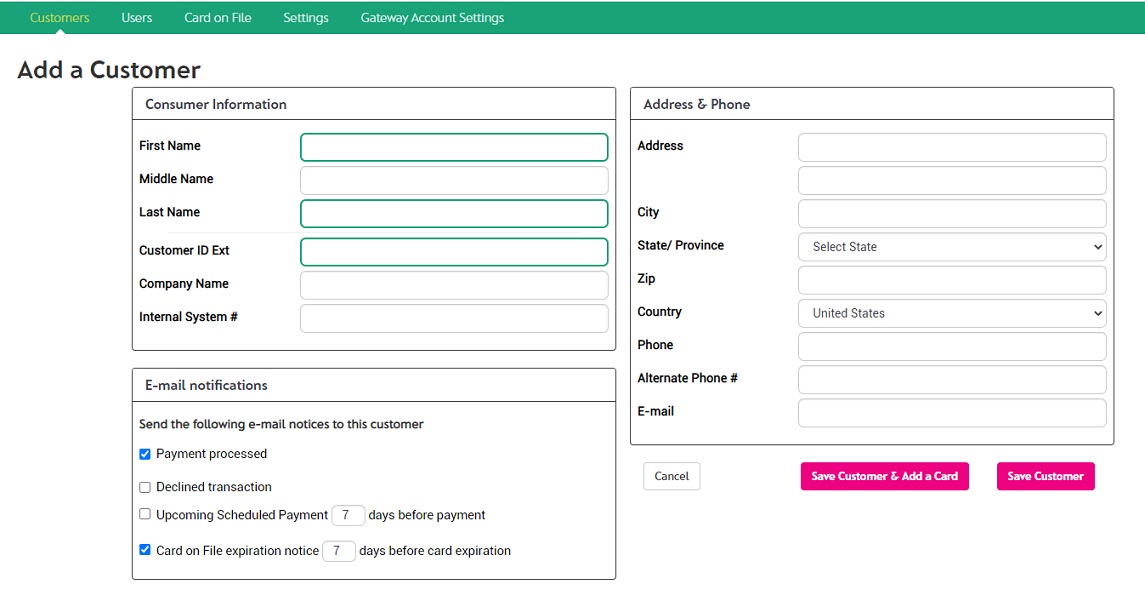
- For example, if you type in Internal System # as a Label for Custom Fields 1, Internal System # will appear on the Add a Customer screen.
- Custom Fields can be made visible on Customer Receipts by checking the Receipt Visible checkbox next to the field in Settings.
- Only Custom Fields with Labels will appear in Customer Section. If a Label is NOT entered, the Custom Field WILL NOT appear in the Customer profile.
Using Customer Custom Fields with API Interface
- If you are using the API Interface, you can continue to pass Client Data Fields according to the API Interface Specification regardless if Customer Custom Fields are enabled or disabled within the Paymentsite Settings section.
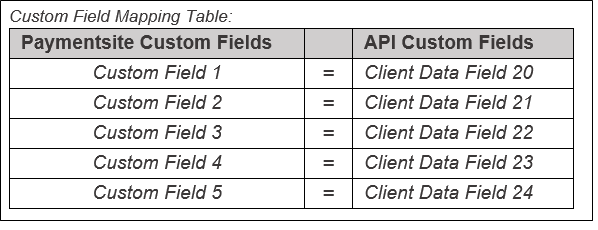
- The API Interface currently passes custom data through as Client Data Fields 20, 21, 22, 23 and 24.
- When using both Paymentsite Customer Custom Fields and the API Interface Client Data Fields, it is important to make sure the data being passed into the API and the data being entered into Paymentsite correlate to the same field and label for both interfaces.
- For example, if you use Internal System # as Custom Field #1 in Paymentsite, you would need to make sure the correct Client Data Field being passed by the API is Internal System # data.
- IMPORTANT: If Customer Custom Fields and Client Data Fields are using different data types, you will run the risk of not being able to map your data properly on reports or other systems.
- Please use the following mapping table to ensure both Customer Custom Fields in Paymentsite and Client Data Fields in the API Interface match.
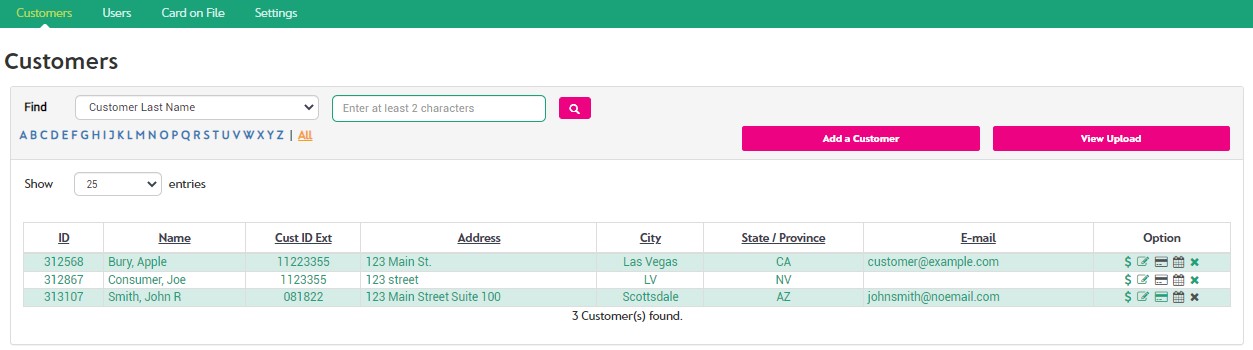
Managing Your Customers
You can store your customer information (add, delete, and view customers). This allows you to quickly retrieve it to speed payment processing. You may associate one or more forms of payment on file with a single customer. You can add a Payment On File (Card or ACH) with or without having a corresponding saved Customer.
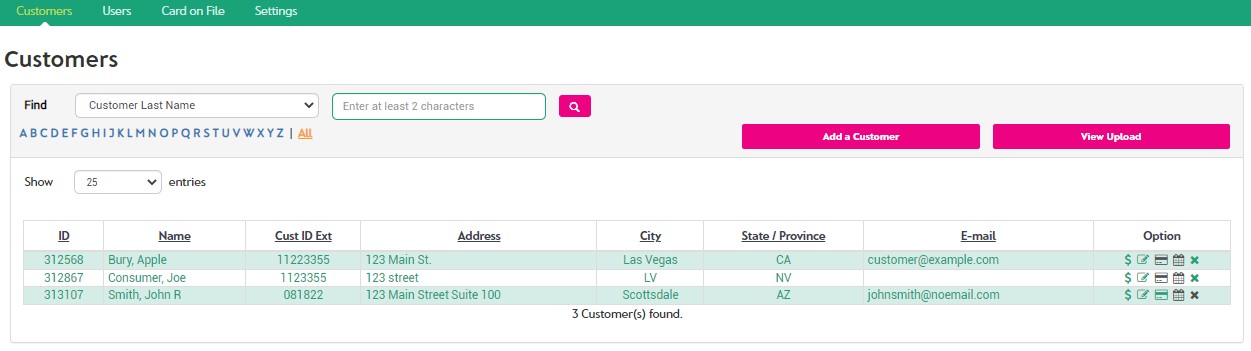
- To manage customers, navigate to the Customers page in the Admin section.
- Search Options: Select the customer, click on an icon in the Options column and:
- Make a Payment
- Edit the Customer
- Create or Modify Card on File
- If a Card on File record does not exist, the icon will display black and the hover message will indicate 'add Card on File'.
- If a Card on File record exists for the customer, the icon will display green and the hover message will indicate 'manage Card on File'.
- Schedule a Recurring Payment
- If no Schedule Payment record exists, the icon will display black and the hover message will indicate 'add schedule payments'.
- If a Schedule Payment record exists for the customer, the icon will display green and the hover message will indicate 'schedule payments report'.
- Delete a Customer
- Clicking on an icon in the Option column will open the appropriate page with the selected customers data pre-populated.
- You can add customers manually one at a time or upload a spreadsheet of customer information. If you have several customers, you will probably prefer to upload a spreadsheet.
To upload a customer information SPREADSHEET:
- Prepare your customer information file. You can add or update customers in your upload file. See Preparing your Customer Upload File for full instructions.
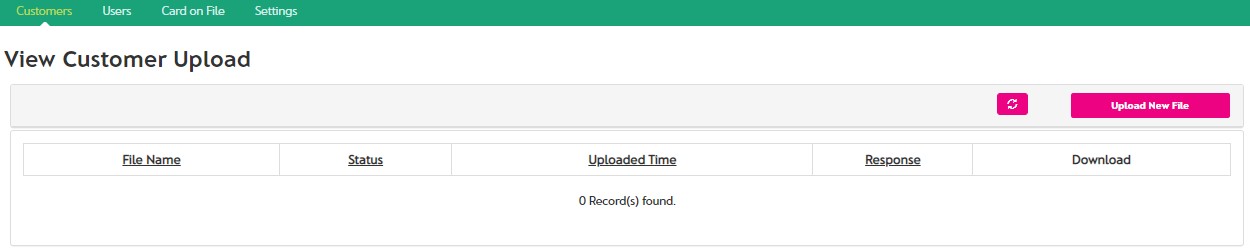
- Upload your prepared file by clicking the View Upload button:
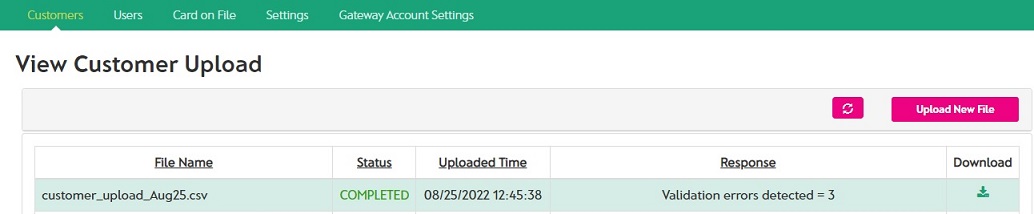
- This opens the View Customer Upload screen.
- Click the Upload New File button, select your file and click the Submit button on the dialog box.
- The list of uploaded files will display.
- It will take some time to process your customer information file. Refresh the list by clicking the Refresh icon to see the processing status of your uploaded customer file.
- When your file has been processed, a response message and a Download file icon will appear, allowing you to download a file that tells you the result of each customer add or update request that you included in your file.
To add customers manually:
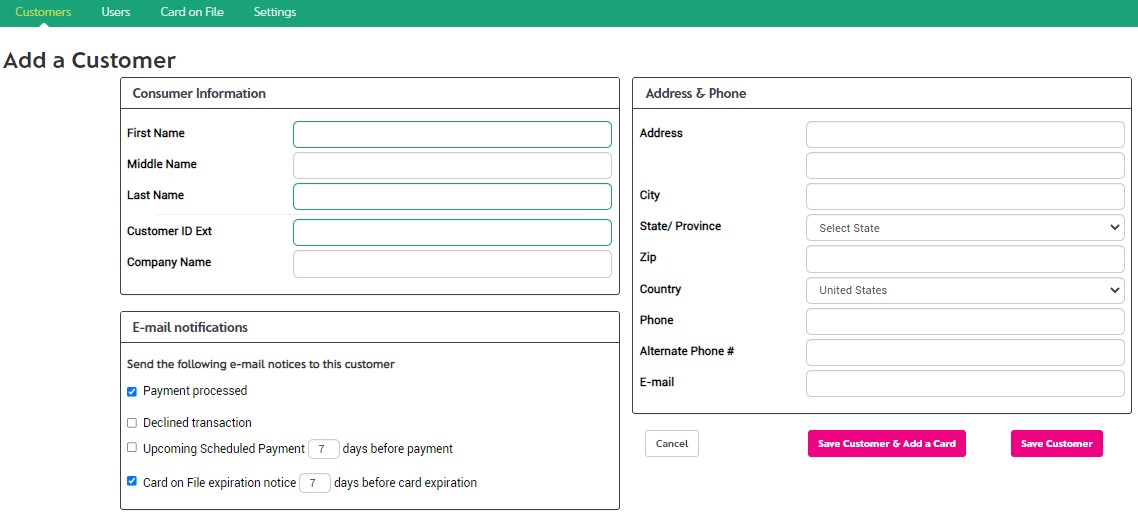
- Click on the Add a Customer button towards the top of the screen.
- Complete the fields on the Add a Customer page:
- Type in the customer information. At the minimum, you must provide:
- Customer First Name
- Customer Last Name
- Customer ID Ext: this number can be your customer account number or other customer ID number to help you identify this customer and tie it with your other business systems.
- Click on the Save Customer or Save Customer & Add a Card button when complete, or click the Cancel button to back out without saving.
- Save Customer & Add a Card button will save the Customer record and open the Card on File screen with the Customer data pre-populated.

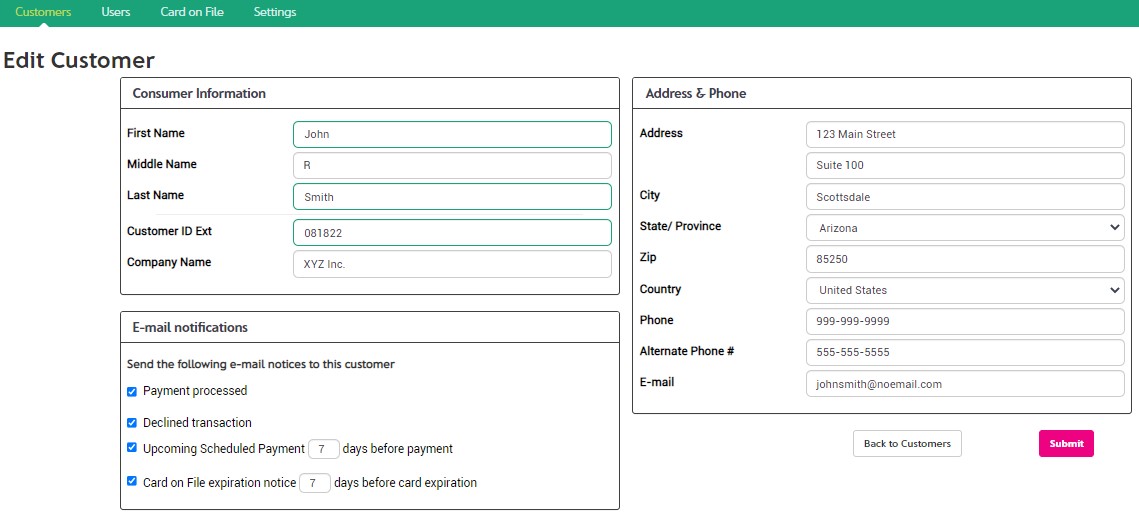
To update customer information:
You have two options for updating customer information:
- Manual update:
- Click on the Edit icon associated with the customer you wish to update.
- The Edit Customer page will display.
- Edit the customer's information and save it by clicking the Submit button, or click Back to Customers button to cancel.
- Upload File:
- Prepare your file, then click on View Upload button, followed by the Upload New File button.
- For each customer to be updated, you'll need to put a U (for Update) in the first column and include the system-assigned customer ID (Customer ID Ext) number in the 2nd column.
- You can find the system-assigned ID number in the response file from the previously uploaded customer file.
How to do a Manual Update:
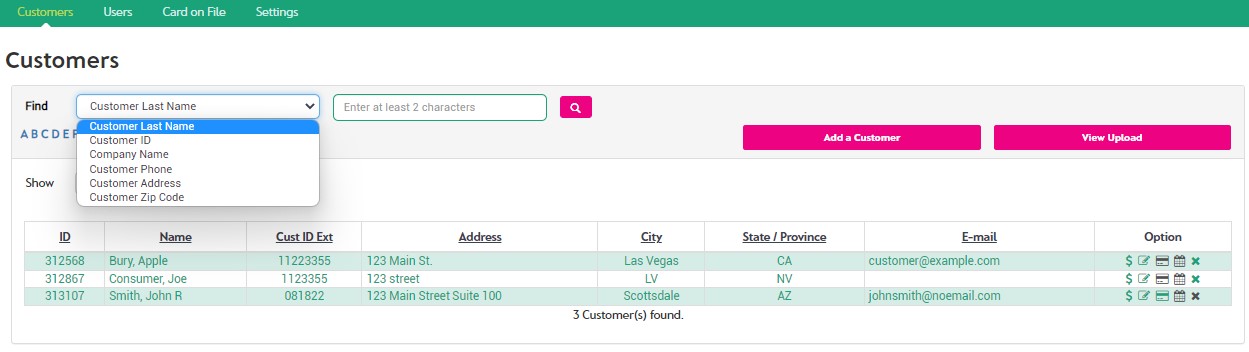
- Go to Admin / Customers page.
- Select a Search option from the Find picklist, enter the values and click the Search button.
- Search (Find) features have been expanded to include:
- Customer Last Name: enter at least 2 characters of the last name; sm for Smith, etc.
- Customer ID: enter at least 2 characters of the Customer ID.
- Company Name: enter at least 2 characters of the Company Name; LLC will result in all customers with LLC in the company name, etc.
- Customer Phone: enter at least 3 digits for the phone number.
- Customer Address: enter at least 2 digits for the Address (address line 1 or address line 2).
- Customer Zip Code: enter at least 4 characters for Zip code.
- Custom Field 1 (if enabled): enter at least 2 characters of data from your Custom Field 1.
- Custom Field 2 (if enabled): enter at least 2 characters of data from your Custom Field 2.
- Custom Field 3 (if enabled): enter at least 2 characters of data from your Custom Field 3.
- Custom Field 4 (if enabled): enter at least 2 characters of data from your Custom Field 4.
- Custom Field 5 (if enabled): enter at least 2 characters of data from your Custom Field 5.
- Select the customer to be modified / updated and click on the Edit Customer icon in the Option column.
- In Edit Customer page, complete the updates and click Submit button to Save or Back to Customers button to Cancel.
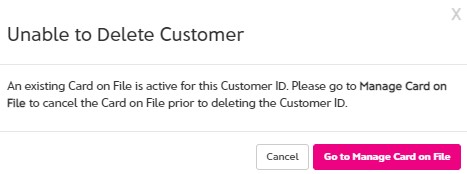
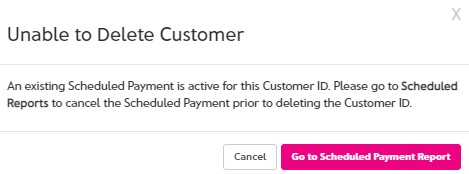
To delete a customer:
- In Customers page, select the customer to be deleted
- In Option column, click the Delete icon
- If a Card on File and / or Scheduled Payment record exist for the customer, you will be prompted to cancel them before the Customer record can be deleted
Preparing Your Customer Upload File
- You can use Microsoft Excel or another similar spreadsheet program for preparing your customer information file.
- The file must be saved in Comma Separated Value format (CSV) for successful upload and processing.
- Since the file format uses commas to separate fields, it is important not to use commas in your data.
- You may include a 'header' row as the first row in the .csv file.
- Using one row per customer, enter the information into the file, populating each row with the following information for each customer:
- The prepared file would look like this, with 3 records to be added:
- Save the file in CSV format. Then, to confirm the data is correct, you can open the CSV file in Notepad or any text editor, and it should look like this:
- Make sure any dates or zip codes with a 0 at the start have not been reformatted by the spreadsheet program.
- A blank field in Excel would just show as two commas with nothing in between in the csv file.
- Navigate to Admin / Customers . The Customers page will be displayed.
- Click on View Upload button on the right hand side to Upload a customer file.
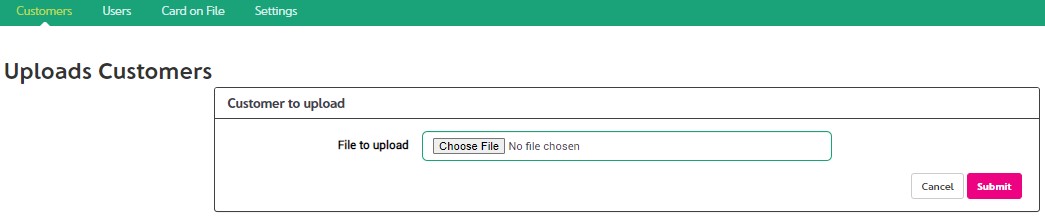
- Click on Upload New File button.
- The Uploads Customers page will display.
- Click the Choose File button, select the file on your computer, then click Submit button to proceed or Cancel button to cancel. After clicking either button you will be returned to the View Customer Upload page.
- Click the Refresh button to refresh the page.
- Once the file is successfully uploaded, you can Download the result file.
- The result file will include the system-assigned customer ID (necessary for Updates) and the result for each line (Added or Updated, or error), like this:
| Column | Field Name | Required? | Example | Max Length | Possible Values / Description |
|---|---|---|---|---|---|
| A | Add or Update | R | A | 1 | A To Add a new record or U To Update an existing customer |
| B | System-assigned ID | C | 123123 | 64 | Required for customer updates |
| C | First Name | R | Joe | 64 | Customer first name |
| D | Middle Name | O | A | 64 | Customer middle name |
| E | Last Name | R | Johnson | 64 | Customer last name |
| F | Customer ID Ext | R | J091238 | 64 | Merchant-assigned ID or customer account number |
| G | Address 1 | O | 123 Main St | 128 | Customer address, line 1 |
| H | Address 2 | O | Suite 23 | 128 | Customer address, line 2 |
| I | City | O | Moorpark | 64 | Customer city |
| J | State | O | CA | 2 | 2-digit state code |
| K | Zip | O | 91311 | 10 | Zip or postal code |
| L | Country | O | US | 2 | 2-digit country code |
| M | Phone | O | (805)123-1232 | 32 | Customer phone number |
| N | O | test@test.com | 128 | Customer email address | |
| O | Date of Birth | O | 12/31/1970 | 10 | Customer birthdate, in mm/dd/yyyy format |
| P | Alternate phone | O | (805) 456-7890 | 32 | Alternate phone number |
| Q | Gender | O | M | 1 | M for Male, F for Female |
| R | Company | O | Acme Enterprises | 64 | Alpha Numeric |
| S | Custom Field 1 | O | Your custom data here | 100 | Alpha Numeric |
| T | Custom Field 2 | O | Your custom data here | 100 | Alpha Numeric |
| U | Custom Field 3 | O | Your custom data here | 100 | Alpha Numeric |
| V | Custom Field 4 | O | Your custom data here | 100 | Alpha Numeric |
| W | Custom Field 5 | O | Your custom data here | 100 | Alpha Numeric |

A,,Joe,C,Williams,333,123 Main Street,Ste 120,Chicago,IL,31111,US,401-555-1212,joe1@consumer.com,,,
A,,Mary,,Smith,555,234 Blackstone Blvd,#8,Providence,RI,02906,US,916-555-1212,example@example,,,
A,,John,,Brown,654,456 42nd Street,,Omaha,NE,61234,US,312-555-1212,john@consumer.com,,,
A,62980,Joe,C,Williams,333,123 Main Street,Ste 120,Chicago,IL,31111,US,401-555-1212,joe1@consumer.com,,,,Added
A,62981,Mary,,Smith,555,234 Blackstone Blvd,#8,Providence,RI,02906,US,916-555-1212,example@example,,,,Added
A,62982,John,,Brown,654,456 42nd Street,,Omaha,NE,61234,US,312-555-1212,john@consumer.com,,,,Added
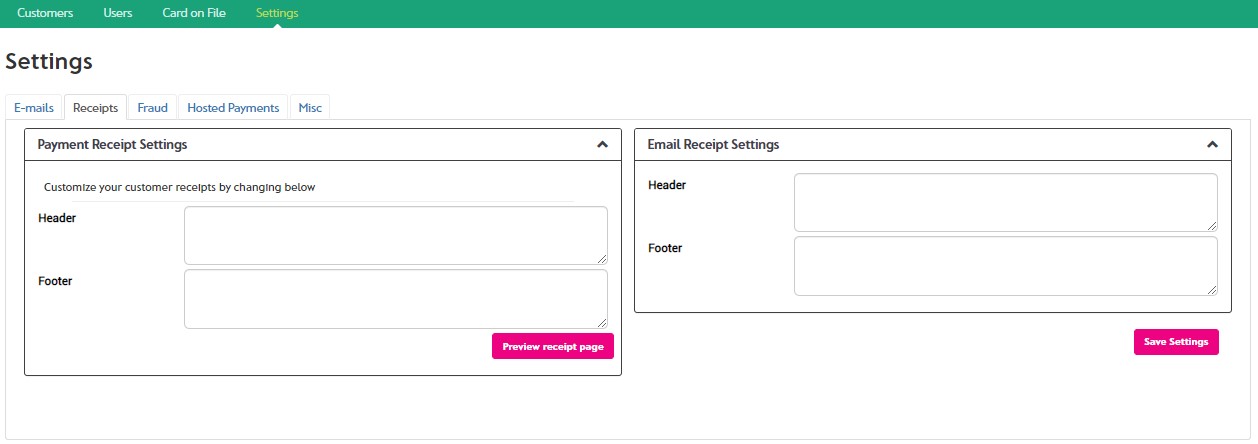
Customizing Your Receipts
The header and footer of receipts can be customized. Note that customizing Email header and footer involves different fields than customizing Payment Receipts (usually printed or saved).
- Navigate to Admin / Settings and click on the Receipts tab.
- Complete the Payment Receipt and Email Receipt fields. Click on Preview receipt page button to preview the receipt with your header and footer customizations (applies to printed receipts only).
- If your administrator has uploaded a logo for your business, the logo will be displayed on the Payment Receipts.
- Click the Save Settings button to save your customizations.
Saving Cards And Accounts On File
If you have repeat customers who want you to keep their credit card or bank account number on file for future purchases, you can enter their account information into the portal and it will be available as a payment option whenever that customer makes a new payment.
The advantages of keeping a card or account on file are:
- It makes future purchases faster. When it's time to process a new payment for the customer, you simply use the customer lookup feature, enter the amount, and select card on file as the payment type. No need to collect or type in payment information.
- It increases security. Because the payment information isn't transmitted to the gateway with each transaction, it is less likely to get intercepted in transit.
- If there is uncertainty as to how much the customer might owe at the time of purchase, you can collect their payment information and save it on file, then process the payment later once the amount is known.
- You lower your own risk of compromising customer information by keeping the payment information on our Level 1 PCI Certified system rather than at your office. Remember, credit card numbers must be encrypted when stored if you keep them at your office (see PCI DSS specification for more info).
NOTE: Transactions using a Card On File will process as "card not present" transactions, which can affect processing rates. This is true even if the transaction is set to "retail" if a card on file is used.
To Save a Card or Bank Account on File
There are several ways to create the Card or Account on File record:
- From the Customers page:
- Select an existing customer and click on the Card on File icon in Options column. The Add Card on File screen displays with the customer data pre-loaded.
- Direct entry into the Add Card on File page:
- Manually search for an existing customer, then complete the fields and save the Card on File Record.
- Create a Card on File record without creating a customer record.
Navigate to the Card On File page in the Admin section
- On the Card On File page, click the Add New Card on File button at the top right
- Cards on File can be associated with a Customer that has been added to the system, but this is not required.
- To add a card on file to an existing customer, select a Search option from the Find pick-list, enter the values and click the Search button.
- Search Options:
- Customer Last Name: enter at least 2 characters of the last name; sm for Smith, etc
- Customer ID: enter at least 2 characters of the Customer ID
- Company Name: enter at least 2 characters of the Company Name; LLC will result in all customers with LLC in the company name, etc
- Customer Phone: enter at least 3 digits for the phone number
- Customer Address: enter at least 2 digits for the Address (address line 1 or address line 2)
- Customer Zip Code: enter at least 4 characters for Zip code
- Custom Field 1 (if enabled): enter at least 2 characters of data from your Custom Field 1
- Custom Field 2 (if enabled): enter at least 2 characters of data from your Custom Field 2
- Custom Field 3 (if enabled): enter at least 2 characters of data from your Custom Field 3
- Custom Field 4 (if enabled): enter at least 2 characters of data from your Custom Field 4
- Custom Field 5 (if enabled): enter at least 2 characters of data from your Custom Field 5
- The system will display a list of your customers that match.
- Select the customer from the list.
- The system will populate the Billing Information fields with the data associated with the Customer.
- You should confirm with the customer that the Billing Information for the card or account is the same.
- Skip the step of searching for and selecting a Customer if you do not wish to associate the new card on file with a saved Customer.
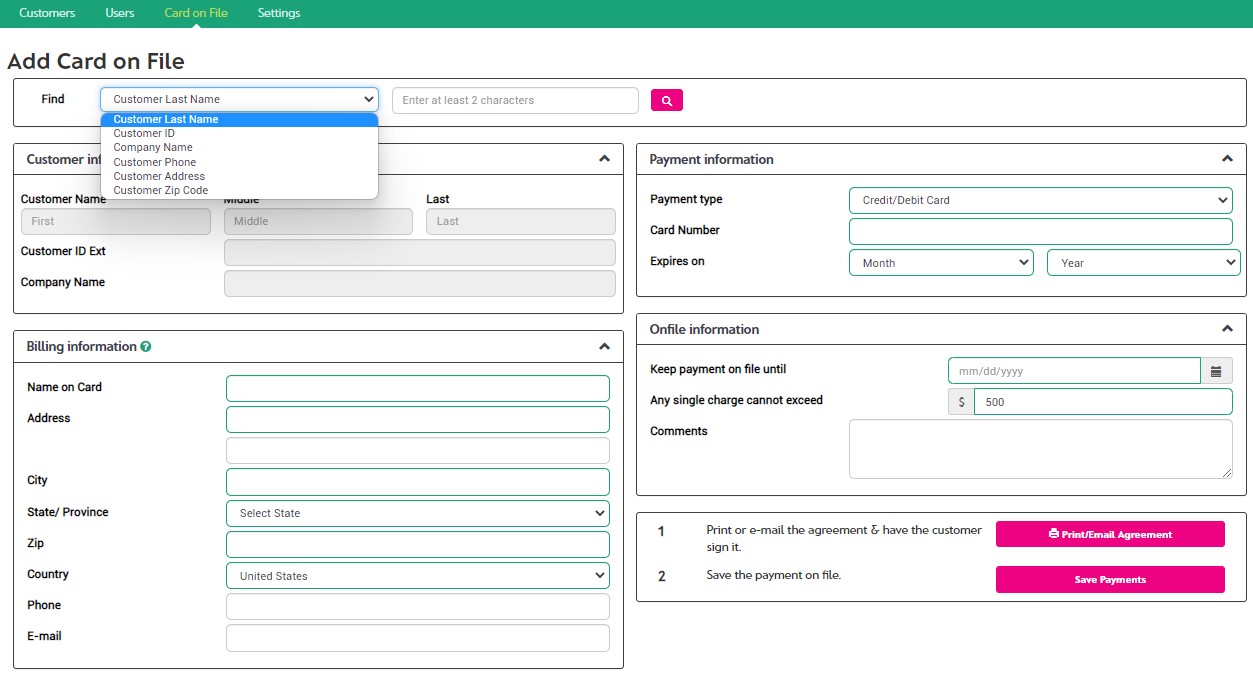
- Billing Information: If not already populated and validated, enter the billing information.
- An email address is required IF the customer would like to receive an email receipt.
- Payment Information:Select the Payment Type from the drop down
- - Credit/Debit Card or Checking Account. The other Payment Information fields will automatically change depending on your selection.
- If it is a credit or debit card, select the Credit / Debit Card option, and enter the Card Number and the Expiration Date.
- If it is a checking or savings account, select the Checking Account option and enter the Routing Number, Account Number and Account Type for the account.
- Onfile Information:
- Keep payment on file until: Enter a date (in mm/dd/yyyy format) or click on the calendar to select a date when this card or account should no longer be used. This is often set to the card expiration date.
- Any single charge cannot exceed: Enter a maximum amount the customer will allow to be charged on this card (or bank account) at one time.
- Comments: Enter any comments you wish to record about this card on file. This Comment field does not print on the receipt or Payment on File Agreement.
- Print / Email Agreement: Click the button to print a copy of the agreement for the customer to sign. You may want to print two copies--one for the customer, one for your records. Keep the signed agreement for your records.
- Save Payments: Click the button to save the card (or account) on file. The next time you process a payment for this customer, the card (account) will be available as the default payment method for this customer.
- The page should reload with a message at the top right in green indicating the card on file was saved successfully.
Updating Cards or Accounts On File
You can save a customer's payment information on file for future charges, but from time to time you may need to make changes or delete a customers' card (or bank account) that you have saved on file.
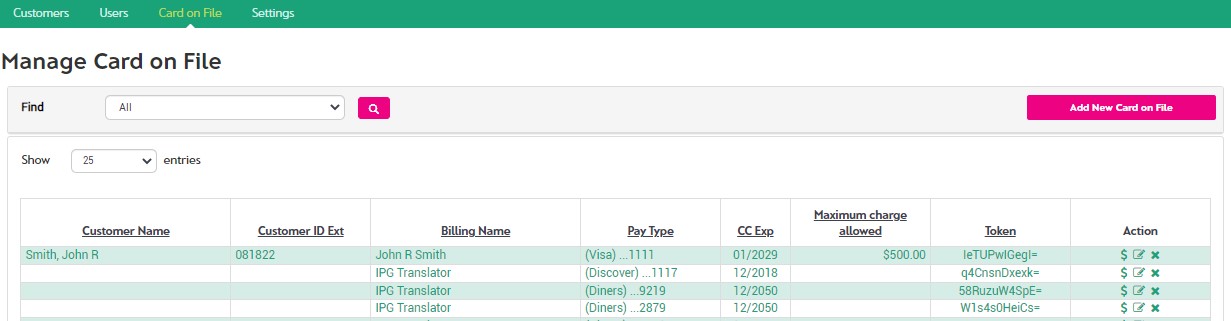
To view a list of your cards (and accounts) on file:
- Navigate to the Card On File page under Admin.
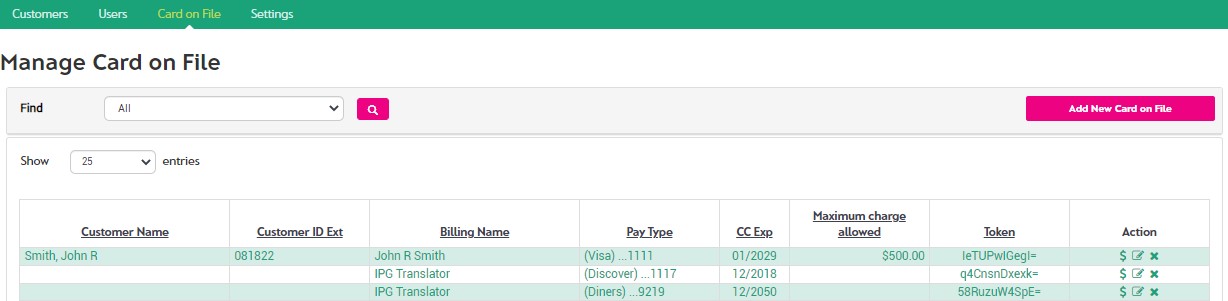
- The Manage Card on File screen will display.
- Customer Name: The name of the customer with whom the payment on file is associated (if any)
- Customer ID Ext: This is the customer ID
- Billing Name: The Billing Name for the card or account (can be different from the Customer Name)
- Pay Type: The type of payment on file
- CC Exp: The card expiration (if applicable)
- Maximum charge allowed: The configured maximum charge amount
- Token: The system token value (for use with file uploads or API transactions)
- Action column:
- Make Payment
- Edit the existing Card on File record.
- Delete the existing payment on file.
To Make Changes to a Card or Account on File
- In the Card on File list, for the card or account you wish to edit, click on the associated Edit icon located in the Action column (the right-most column).
- Make changes to the information as desired. Changes are allowed only for the following (to change anything else, delete the original record and create a new one):
- Billing name and address
- Payment Information:
- If Payment Type is Checking Account: Routing Number, Account Number and Account Type can be edited.
- If Payment Type is Credit/Debit Card: Card Number, Expiration Date can be edited. Changes to payment information is allowed in case the customer's card has expired, and a new card has been issued with a different account number.
- Onfile Information:
- Keep payment on file until: (date)
- Any single charge cannot exceed: An amount is required.
- Comments: Comments entered in this field will not print on the Card on File Agreement or the printed / emailed receipt.
- Click the Print/Email Agreement button to print the agreement. We recommend you provide a copy for the customer and have the customer sign one for you to keep in your files.
- Click the Save Payments button to save your changes.
To Delete A Card Or Account On File
- In the Card on File List, for the card or account you wish to delete, click on the associated Delete icon located in the Action column (the right-most column).
- A dialog box will appear, stating that this operation will delete the card on file.
- Click the Yes button to continue, or the No button to cancel and return to the Card on File List.
To Add A New Card On File
- In the Card on File List, click the Add New Card on File button located at the top right-hand side.
- Follow the instructions as described in Saving Cards Or Accounts On File.
Changing Email Notification Settings
There are 2 types of email notifications.
- Merchant Emails: Those emails are sent to the administrative email address for you, the merchant.
- Consumer Emails: Consumer emails are sent to your customers by Paymentsite on your behalf.
You can have automated e-mail receipts sent to your customers each time a payment is processed. You can also choose to receive an e-mail notification yourself each time a transaction is processed. Additionally, you can receive e-mail notifications when a card you have on file or for a scheduled payment is about to expire to give you time to take action to correct it.
To Change Your Notification Settings
- Navigate to the Settings page in the Admin section.
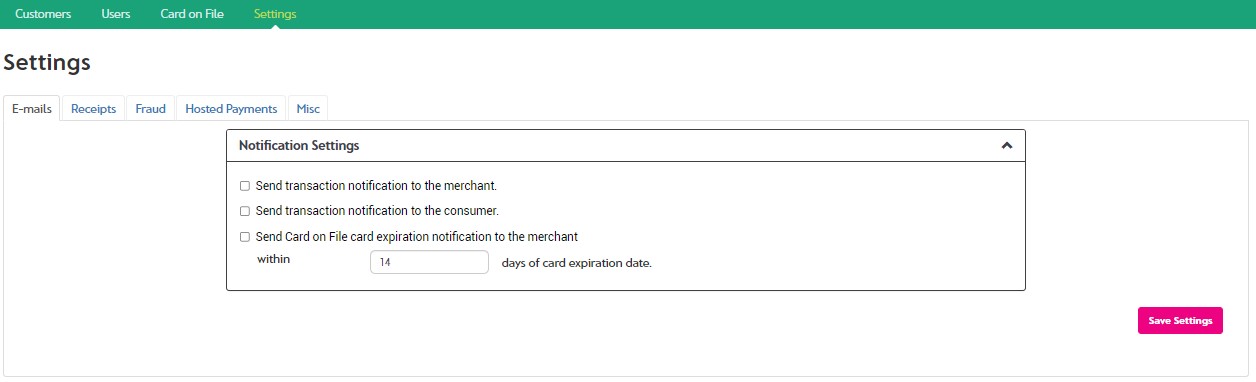
- The E-mails tab displays.
- Check the associated checkbox for each e-mail notification you wish to activate:
- Send transaction notification to the merchant will send an e-mail to the e-mail address on file with Agave Paymentsite for your business each time a transaction is processed.
- If you process a high volume of transactions, this e-mail address will receive a significant amount of e-mails, so you may wish to set up a specific inbox to receive these e-mails.
- If you wish to change your e-mail address on file, contact Customer Support at support@paymentsite.com or (866) 546-8749.
- Send transaction notification to the consumer sends an e-mail receipt to the customer's e-mail address when a transaction is processed.
- If the customer has a card or account on file with you, there will be an e-mail receipt sent each time a payment or return is processed on that card on file.
- If the customer has a scheduled payment set up with you, the customer will receive an e-mail receipt each time a payment in that schedule is processed.
- **NOTE**: There are also settings under individual saved Customers that allow you to turn email notification off for a specific customer. If you turn OFF consumer emails in the Email Settings page, transaction emails will not be sent to any consumer, even if you turn them on for an individual customer in the Add or Edit Customer screen.
- Send Card on file expiration notification to the merchant within ___ days of card expiration date will send an e-mail to the e-mail address on file for your business on each day that a card on file is close to expiring.
- You will receive one e-mail each day that will list all the cards close to expiring.
- You set the number of days before the expiration date you wish to be notified by entering a number in the box.
- Once you have checked all the boxes for the notifications you wish to activate, click on the Save Settings button.
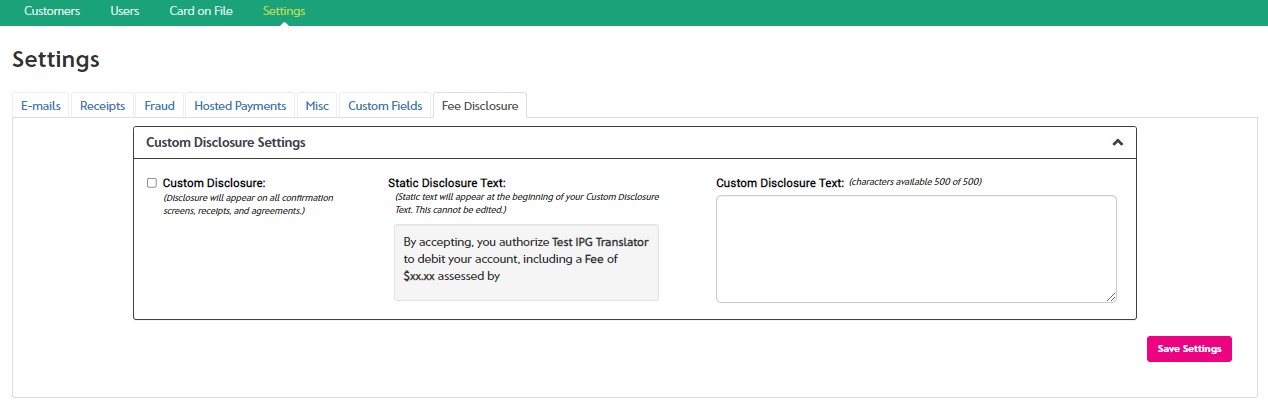
Flex Fee Disclaimer Configuration
ADD FLEX FEE INFO
Configuring Hosted Payments
Clients using their own website to accept payments can use the Hosted Payment product by embedding the Agave Paymentsite page on their website. This can significantly reduce the PCI scope and security risk of accepting payments on a website.
Hosted Payments must be configured to work with your website, and Agave support staff can enable this option upon request. Configuration settings are available in the merchant Portal under Settings -> >>>. Details on configuration of Hosted Payments can be found in the Hosted Payments User Guide at Agave Paymentsite Integration