Card-swipe devices you can use
This portal is configured to work with card-swipe devices for ease of use and to help ensure secure and accurate credit/debit card processing. Swiping a card may also result in reduced processing fees for you.
This portal is compatible with Magtek card readers, including iDynamo and Dynamag. These readers may be encrypted or not.
Other magnetic swipe devices may also work with this portal, but have not been tested for compatibility.
If you would like more information on swipers, please contact Support:
Contact Agave Support at support@agavepay.com or call us at 855-546-8749, option 2 for Support.
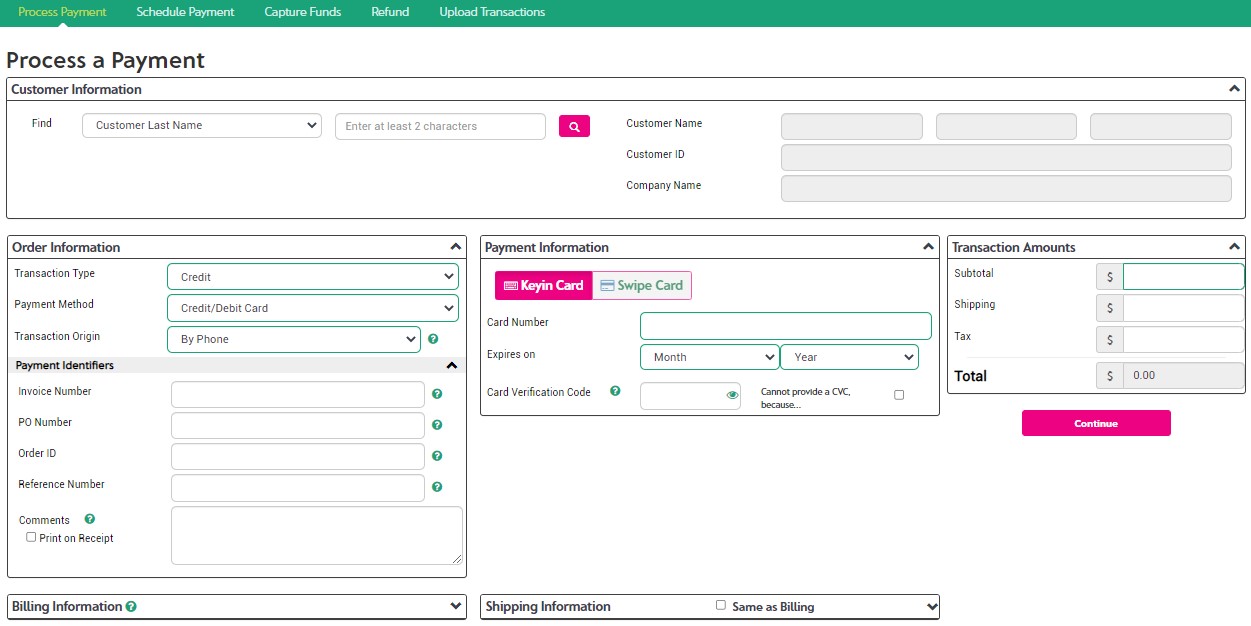
Processing a payment
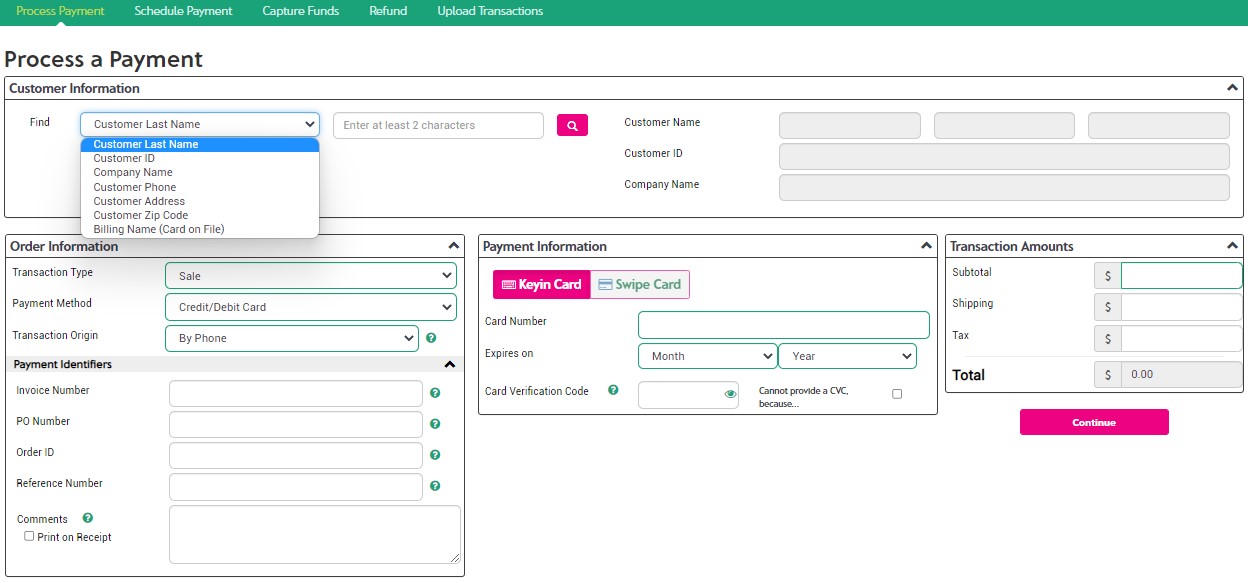
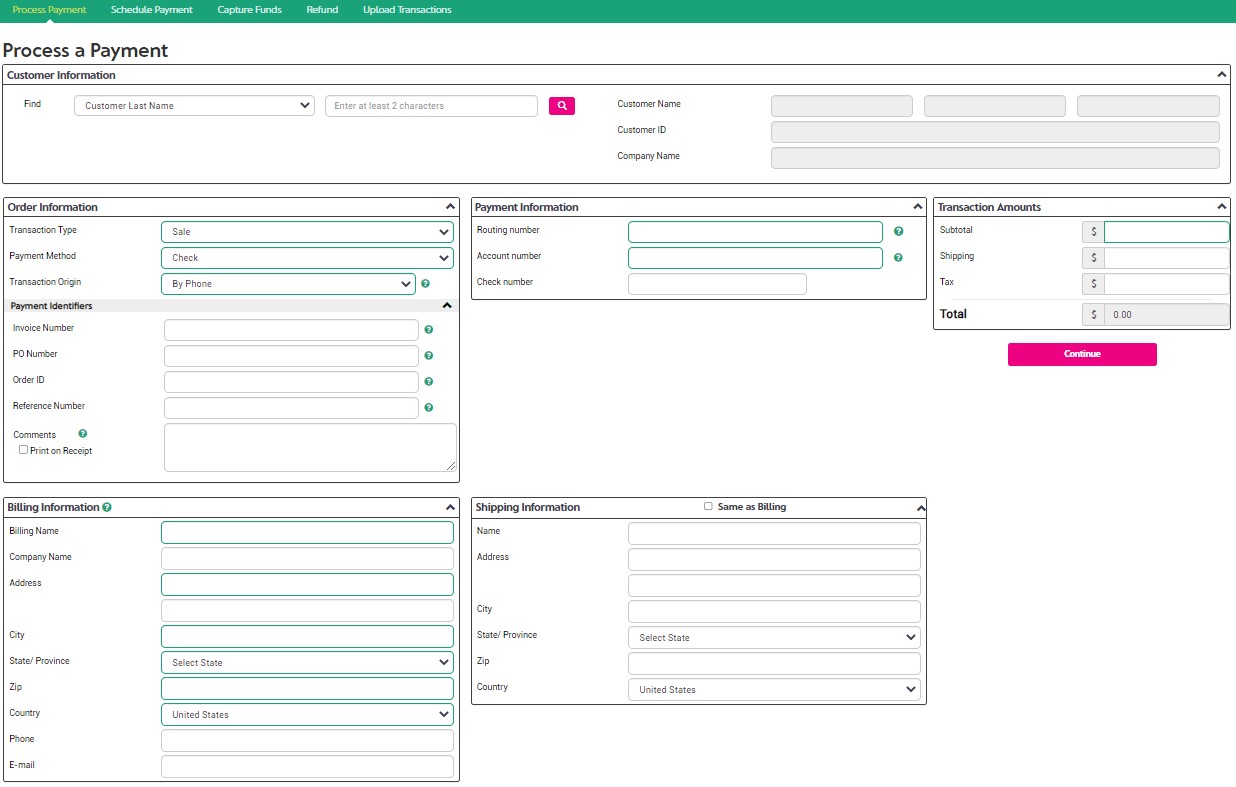
The Process a Payment page can be accessed several different ways:
- From the Customers page - select an existing customer and click the Make Payment icon in the Option column.
- Process a Payment page will display with the customer data populated.
- From the Card on File page - select a customer with an existing Card on File and click the Make Payment icon in the Action column.
- Process a Payment page will display with the customer data populated.
- Hamburger menu / Payments section - Process Payment page.
- An empty Process a Payment page will display.
- Use the Find (search) picklist to search for and select a customer.
- SEARCH options: Process a Payment page, open the Find picklist. The search options are:
- Customer Last Name: enter at least 2 characters of the last name; sm for Smith, etc.
- Customer ID: Customer ID: Enter at least 2 characters of the Customer ID.
- Company Name: Company Name: Enter at least 2 characters of the Company Name; LLC will result in all customers with LLC in the company name, etc.
- Customer Phone: Customer Phone: Enter at least 3 digits for the phone number.
- Customer Address: Enter at least 2 digits for the Address (address line 1 or address line 2).
- Customer Zip Code: Enter at least 4 characters for Zip code.
- Billing Name (Card on File): Enter at least 2 characters of the billing name (if customer has a card on file)
- Custom Fields 1 - 5 (if enabled and configured). Please see Setting up Customer Custom fields in the Administration section of this Help Guide for information about using Custom Fields.
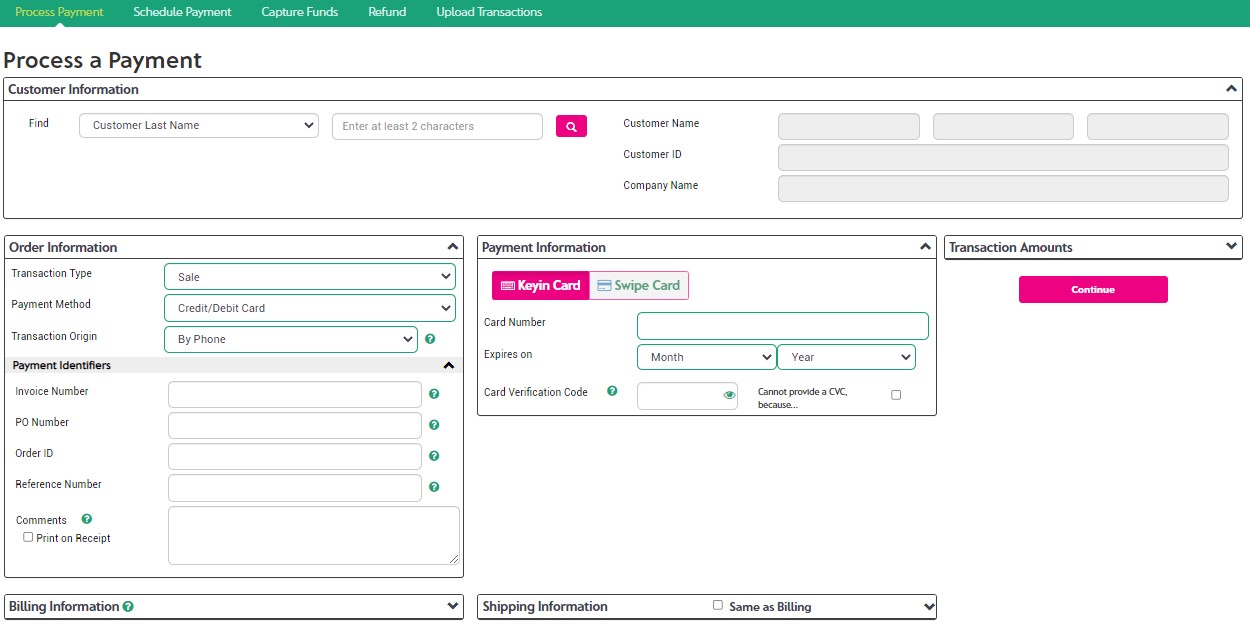
To process a payment:
- Navigate to the Process Payment page in the Payments section.
- To pull up customer information or Card On File that you have already set up in the portal:
- From the Find dropdown, select the criteria you wish to use to locate the saved information.
- Enter the beginning of the name or ID you are searching for.
- Click the Search icon.
- The system will present you with a list of all records that matched your entry. Select the correct record and click the Continue button.
- You will be returned to the Process a Payment page, with the available data filled in by the system based on your selection.
- Complete the Order information section.
- Select the Transaction Type:
- A Sale transaction will settle in the next settlement batch.
- An Auth transaction will place a funds hold on the card, but requires a Capture to settle the funds.
- A Force Transaction is a transaction for which you have already received an approval code, usually by calling your bank for a "Voice Authorization".
- A Credit is a transaction that pushes funds from you (the merchant) to a customer, without referencing a prior transaction.
- Choose a Payment Method: Available methods are Credit/Debit Card, Check, On File or Cash.
- Cash transactions will not move funds, they are used for record keeping purposes.
- If you selected a Customer or Payment on File, the Payment Method will automatically be set to On File, but you can change this if the customer wishes to pay with a different card.
- If an On File record has been selected, the Payment Information section will be populated automatically, as will the Billing Information section. In addition, the Transaction Origin will be set to 'By Phone'(MOTO).
- Choose the Transaction Origin: This field indicates how or where the customer is paying for the order.
- If the customer physically handed you the card, and is present at the time of the transaction, then it is "Retail".
- If the customer is providing their payment information over the phone, or by mail, then select "By Mail" or "By Phone (MOTO)".
- There are very few circumstances under which "Ecommerce" would be used in a Virtual Terminal, an example would be when a customer emails credit card information and you (the merchant) are keying it in (note this scenario would be a PCI DSS problem).
- Invoice Number (optional): Invoice Number is a custom defined/generated value used to track payments with a specific billing invoice. The same Invoice Number can be used for multiple payments.
- PO Number (optional): Purchase Order Number is a unique identifier used to track a specific purchase item related to an invoice.
- Order ID (optional): Order IDs must be unique for all transactions. If you do not provide an Order ID, the system will generate a unique value for you.
- Reference Number (optional): The Reference Number field is a good way to track your transactions versus an external system of orders and invoices that you have. This value should be unique.
- Comments (optional): Comments will print on the email and printed receipts IF the Print on Receipt checkbox is checked.
- Payment Information section: (if it was not automatically populated with an On File).
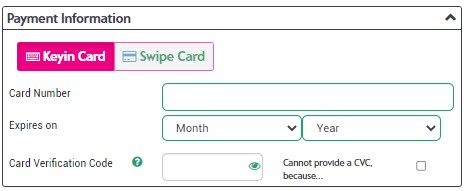
- If you selected a Transaction Origin of "Retail" and a Payment Method of "Credit/Debit Card", you will have the option to Swipe a card. Make sure to click INSIDE the Card Number box BEFORE swiping the card to ensure the data is submitted into this field.
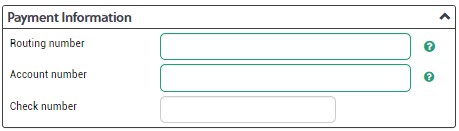
- Otherwise key in the necessary information, which varies depending on your Payment Method.
- Credit / Debit card fields:
- Check fields:
- Transaction Amounts: Enter the transaction amounts, including the Subtotal, Shipping (optional) and Tax (optional).
- Billing Information: Enter or verify the Billing Information.
- If you use the Email Receipts functionality, make sure to provide the customers E-mail address.
- Billing Information is required for non-Retail transactions.
- Shipping Information: Enter or verify the Shipping Information, if desired.
- Once all required fields have been populated and any additional information provided, click the Continue button to go to the Confirmation page.
- If any required fields are not populated, or if any data is not valid, the offending field(s) will be indicated with a message about what's wrong.
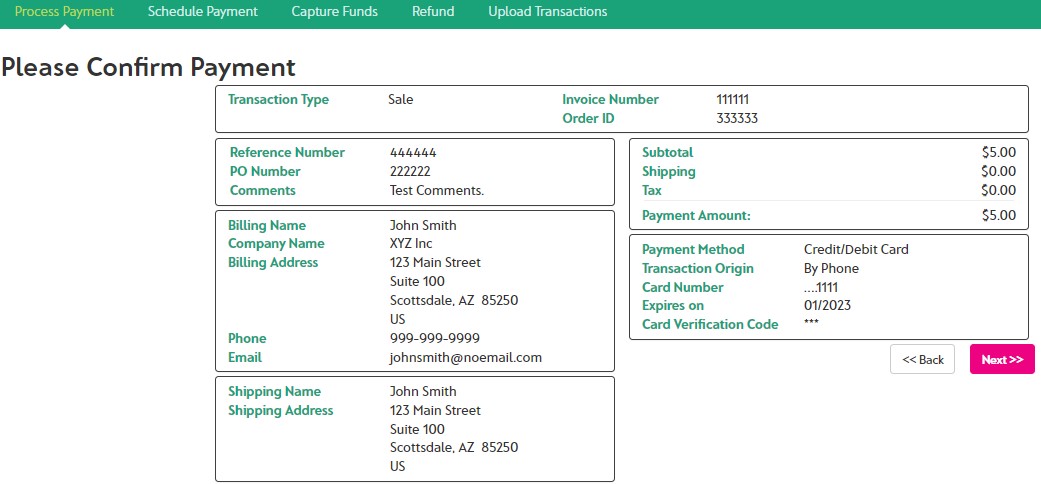
- Review the information on the Confirm Payment page for correctness. Click the Back button to make changes, and click the Next button to submit the Authorization Request.
- If there is an issue with your data, a message will show up on the Confirm page explaining what the issue is.
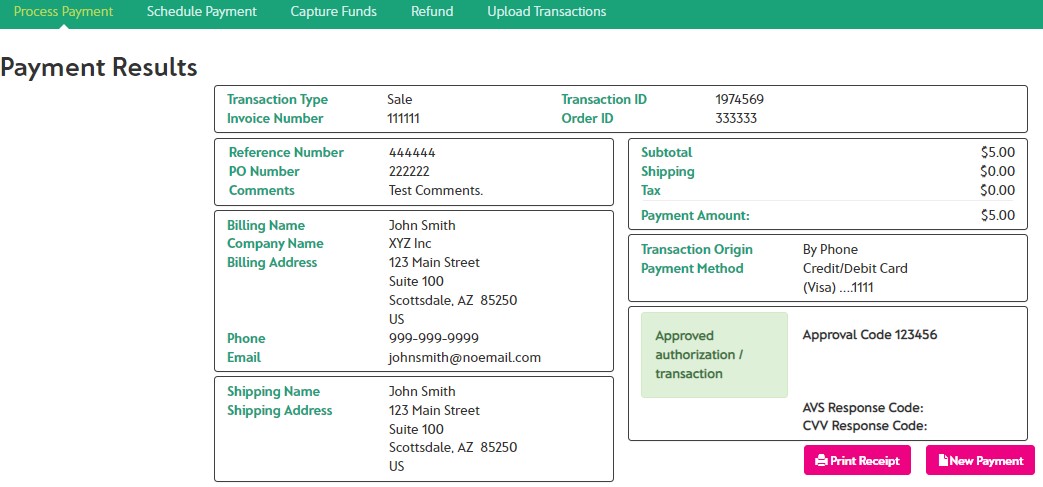
- If there is no issue with your data, the transaction will be submitted for Authorization and you will see a Payment Results page.
- If the payment was Approved, you will see the word APPROVED in a green box, along with the Approval Code, and the AVS and CVV responses (if applicable).
- If the payment was NOT Approved, you will see the word ERROR in a red box, along with a reason for the non-approval (Decline message, error message) and a Response Code (if applicable).
- If you are experiencing an issue with getting a transaction to Approve, please contact Customer Support at support@agavepay.com or call us at 855-546-8749, option 2 for Support.
** NOTE ** Required fields are indicated with a bold outline.
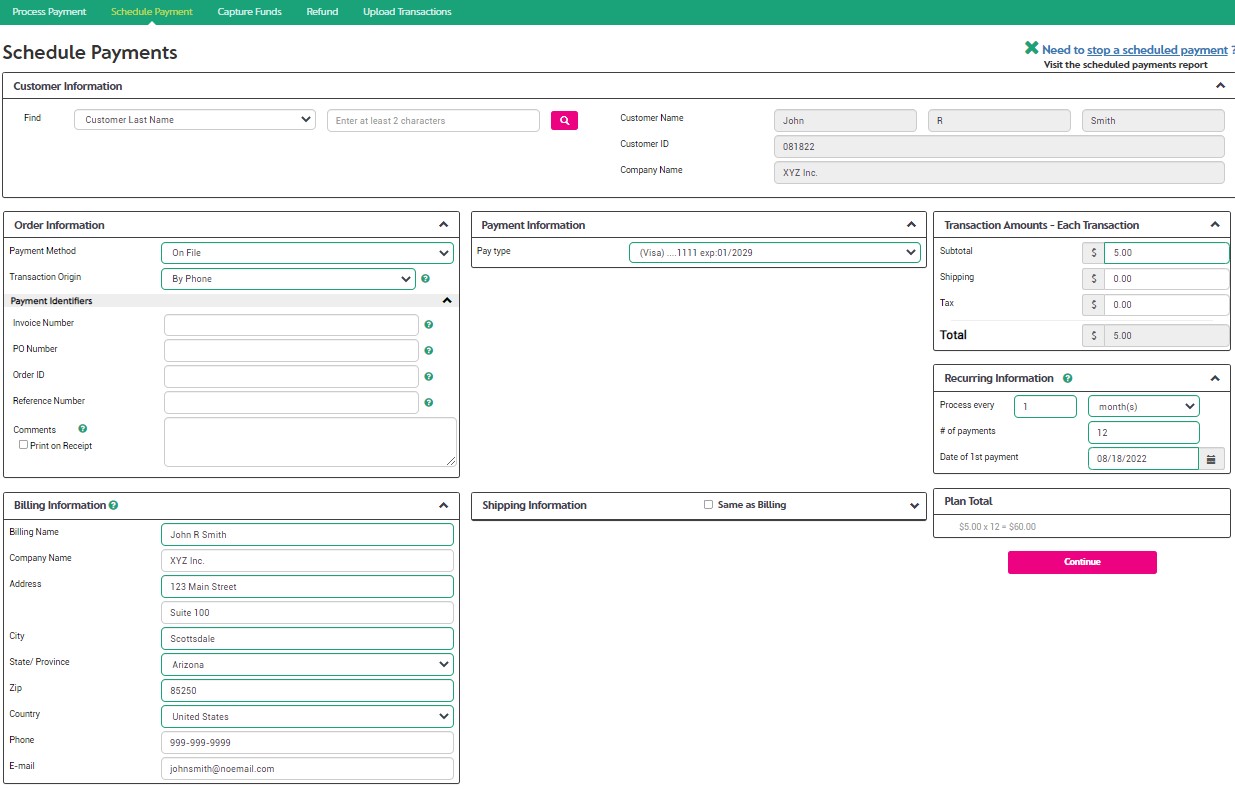
Setting up Recurring Payments
There may be situations where the customer owes more than they can afford in one payment -- or there is a recurring fee that occurs on a regular basis. You can set up a recurring payment schedule, also known as a scheduled payment, to allow them to make affordable weekly, bi-weekly, monthly or quarterly payments. You can also use this function to collect regular service fees, such as membership fees or other fees that do not vary in amount and need to be collected weekly, bi-weekly, monthly or quarterly.
The Schedule Payments page can be accessed several different ways:
- From the Customers page - select an existing customer and click the add schedule payments icon in the Option column.
- Schedule Payments page will display with the customer data populated.
- From the Card on File page - select a customer with an existing Card on File and click the add schedule payments icon in the Action column.
- Schedule Payments page will display with the customer data populated.
- Hamburger menu / Payments section - Schedule Payment page.
- An empty Schedule Payments page will display.
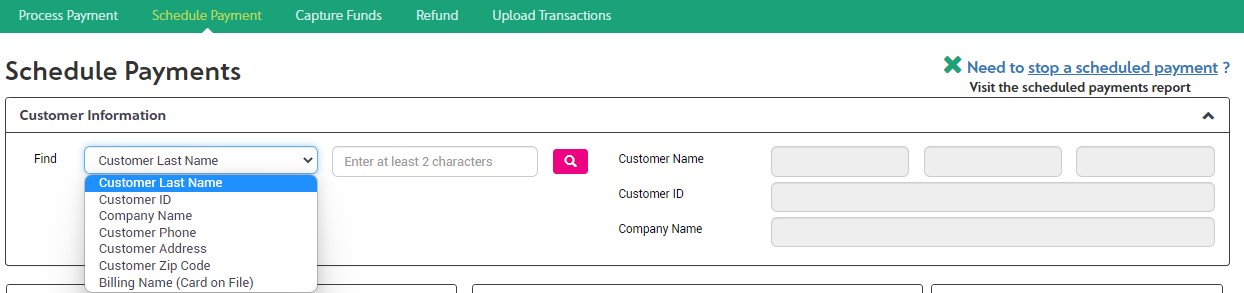
- Use the Find (search) picklist to search for and select a customer.
- Search options:
- Customer Last Name: enter at least 2 characters of the last name; sm for Smith, etc.
- Customer ID: Customer ID: Enter at least 2 characters of the Customer ID.
- Company Name: Company Name: Enter at least 2 characters of the Company Name; LLC will result in all customers with LLC in the company name, etc.
- Customer Phone: Customer Phone: Enter at least 3 digits for the phone number.
- Customer Address: Enter at least 2 digits for the Address (address line 1 or address line 2).
- Customer Zip Code: Enter at least 4 characters for Zip code.
- Billing Name (Card on File): Enter at least 2 characters of the billing name (if customer has a card on file)
- Custom Fields 1 - 5 (if enabled and configured). Please see Setting up Customer Custom fields in the Administration section of this Help Guide for information about using Custom Fields.
To set up a recurring payment schedule:
- Navigate to the Schedule Payment page in the Payments section.
- If the customer is a saved customer or has a payment on file, use the Find (search) section at the top to look up that customers saved information.
- Order Information section:
- Choose a Payment Method:
- Credit/Debit Card: If customer has a Card on File saved and prefers to use a different card OR customer does not have a Card on File saved.
- Check: If the customer is paying by check.
- On File: If the customer has a Card on File (check or credit card) saved the payment information will be populated.
- Select the Transaction Origin:
- NOTE: By definition, a recurring payment is not a card present payment, although the first payment may be card present. Selecting "retail" for the payment plan will affect only the transaction origin of the first payment in the series.
- Invoice Number (optional): Invoice Number is a custom defined/generated value used to track payments with a specific billing invoice. The same Invoice Number can be used for multiple payments.
- PO Number (optional): Purchase Order Number is a unique identifier used to track a specific purchase item related to an invoice.
- Order ID (optional): Order IDs must be unique for all transactions. If you do not provide an Order ID, the system will generate a unique value for you.
- Reference Number (optional): The Reference Number field is a good way to track your transactions versus an external system of orders and invoices that you have. This values does not need to be unique.
- Enter Comments about the transaction (optional): Comments will print on the email and printed receipts IF the Print on Receipt checkbox is checked.
- Set the Payment Information (if you selected a payment on file, this will already be completed).
- Enter the Transaction Amount information that should be collected FOR EACH TRANSACTION.
- Set the Recurring Information: Options must be set for Frequency and Period. Set the Period first (days, weeks, months, quarters), then select the Frequency (Number of Days between each payment).
- Process every (Frequency) Accepts numbers only; frequency of the payments (14 days, 2 weeks, 4 months, etc).
- Period: Values are
- Day(s)
- Week(s)
- Month(s)
- Quarter(s)
- # of Payments: How many times you want it to run (including the first one).
- Date of 1st Payment: Date that the first payment should be collected. If you set the Date of 1st payment to today, the system will immediately run the first transaction.
- Plan Total: Once you have completed the Transaction Amounts section and the Recurring Information section, the Plan Total box will compute the Total of this recurring payment plan. Double check that the total is the correct total to be collected.
- Billing Information: Complete the Billing Information section. Include an email address if the customer would like to receive an email when the payments are scheduled.
- Shipping Information: If desired, complete the Shipping Information section
- Click the Continue button to have the system check the values you have provided
- IMPORTANT! Click the Print/Email Agreement button and make sure to have the customer sign the agreement. Keep a copy for yourself and provide a copy to the customer.
- If the information is correct, click the Next button; to make changes, click the Back button.
- If the payment was Approved, you will see the word APPROVED in a green box, along with the Approval Code, and the AVS and CVV responses (if applicable).
- If the payment was NOT Approved, you will see the word ERROR in a red box, along with a reason for the non-approval (Decline message, error message) and a Response Code (if applicable).
- If you are experiencing an issue with setting up a recurring payment, please contact Agave Support at support@agavepay.com or call us at 855-546-8749, option 2 for Support.

Capturing A Transaction
If you perform authorizations for credit/debit card transactions that you will ship later, you will need to capture them once they're shipped in order to receive payment on that transaction.
- It is important that you perform the capture as quickly as possible after the authorization.
- If it has been more than a couple days since you authorized the transaction, you may want to run a new authorization (or simply do a Sale transaction, which authorizes and captures in one step).
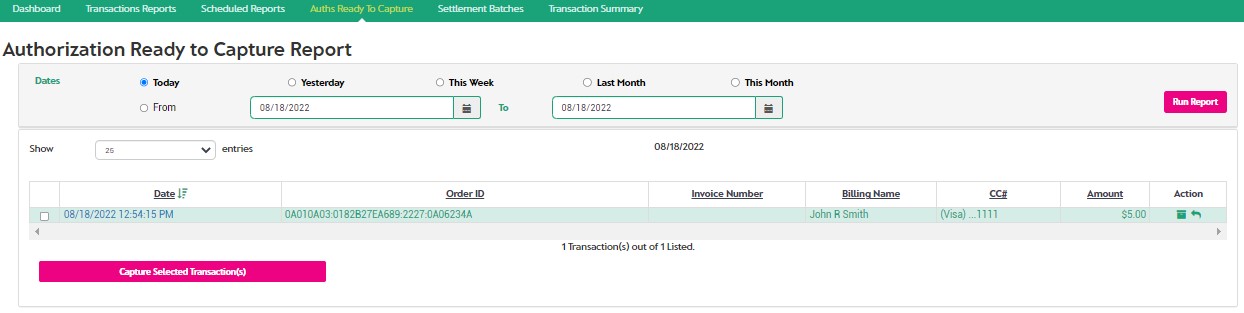
- The easiest way to Capture a transaction that was Authorized previously is to use the Auths Ready To Capture report.
- Navigate to the Auths Ready To Capture page in the Reports section.
- Set the Dates range to include the Authorizations that you want to capture and click Run Report.
- On this page, the Action column will contain 2 icons
- The icon represents Capture Fund. To capture all or part of the Auth, click this icon.
- The icon represents Void. To Void this Auth, click the Void icon. If you do not plan to Capture an Authorization, you should void it.
- On this page, you can also click on the Date/Time of the transaction to open the detail for that Authorization.
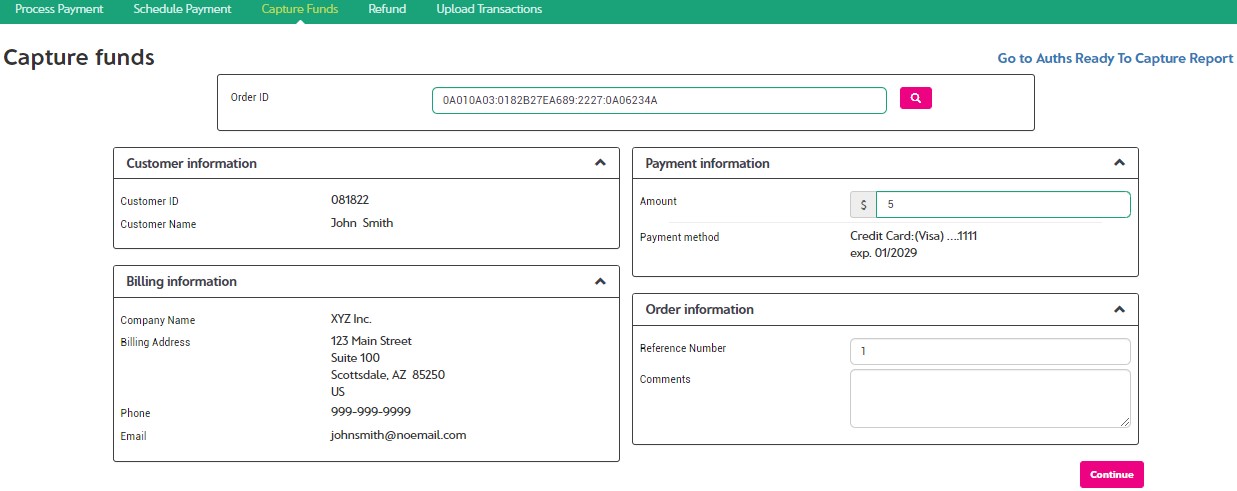
- Clicking the Capture Fund icon will load the Capture Funds page.
- Here, you can simply click the Continue button to capture the entire amount that was originally Authorized, or you can modify the Amount down.
- You cannot capture for an amount higher than the original Authorization.
- Confirm the Capture details and click Next to complete the capture (confirm the payment).
- Click Next again to complete the transaction capture.

Processing a Forced Transaction
Use a Forced transaction when you have an authorization code from a call center. This occurs sometimes when you attempt to process a transaction and you get a response telling you to call into the phone center. These types of transactions are also called Voice Auths or Offline Auths.
- Navigate to the Process Payment page in the Payments section.
- In the Transaction Type dropdown, select Force Transaction. A new field will be shown on the screen and is labeled Authorization Code. Complete this page as for a normal Sale transaction, and fill in the Authorization Code field with the code you received from the bank.
- Click Continue and verify the info.
- Click Next to complete the transaction.
Processing A Refund
Processing a refund is easy with Paymentsites Transaction Report. You can Refund an approved Sale or Capture transaction (to Void an Authorization, use the Auths Ready To Capture page).
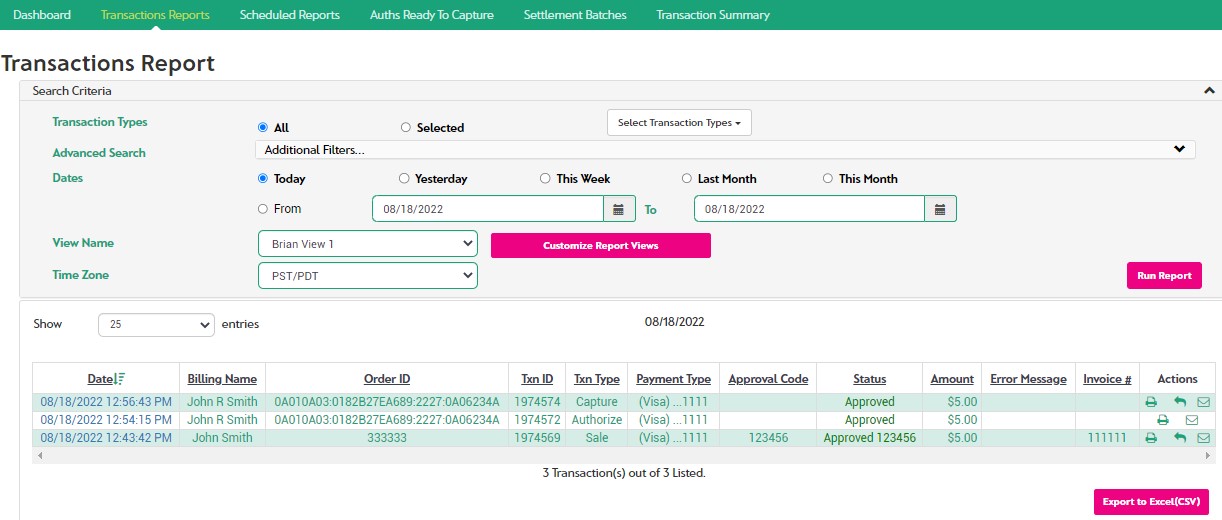
- Navigate to the Transactions Reports page in the Reports section.
- Set the criteria for your transaction search.
- If you know the date of the transaction, set the date range accordingly.
- To find a specific transaction, use the Advanced Search drop down filter section, where you can specify the card first - last 4, the Order ID, the Reference Number and more.
- Once your filters are set, click Run Report.
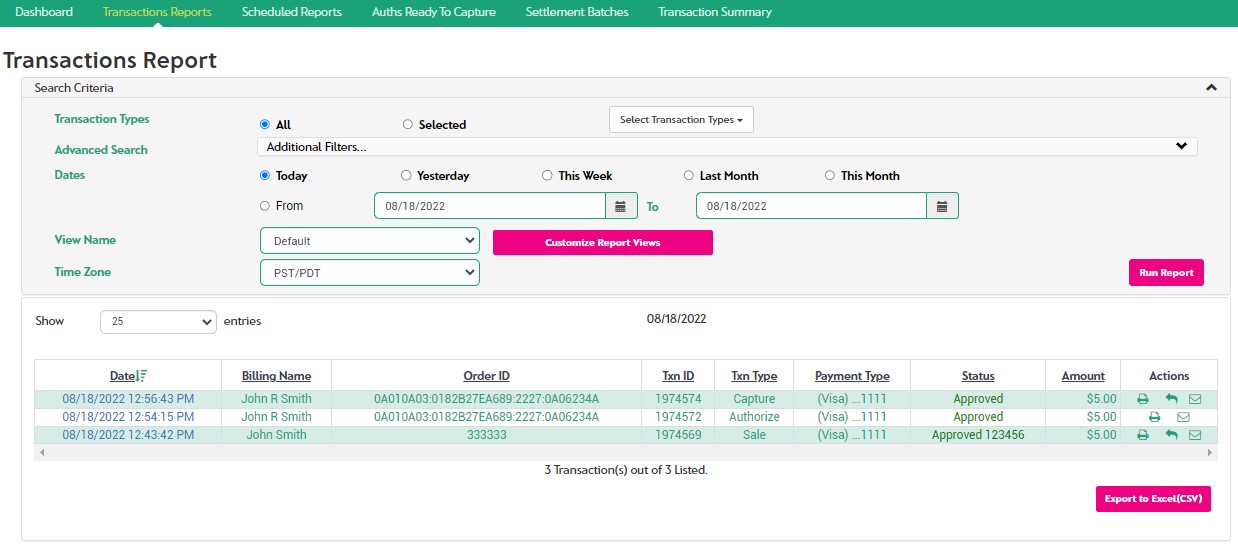
- On this report, the Actions column indicates what actions may be performed on this page.
- The icon represents Print Receipt.
- The icon represents Refund.
- The icon represents Email the receipt to merchant or customer.
- Locate the transaction you wish to refund.
- Click the Refund icon.
- On the Refund page, you will see the Amount that is available to refund on this transaction. This amount may be the original authorization amount. If you have already refunded part of this transaction, the Amount available to refund will be lower than the original auth.
- Set the amount you wish to refund and click Continue.
- Confirm the details on the Confirmation page, and click Next to complete the refund.
- On Payment Results - click Print Receipt to print a copy of the receipt.
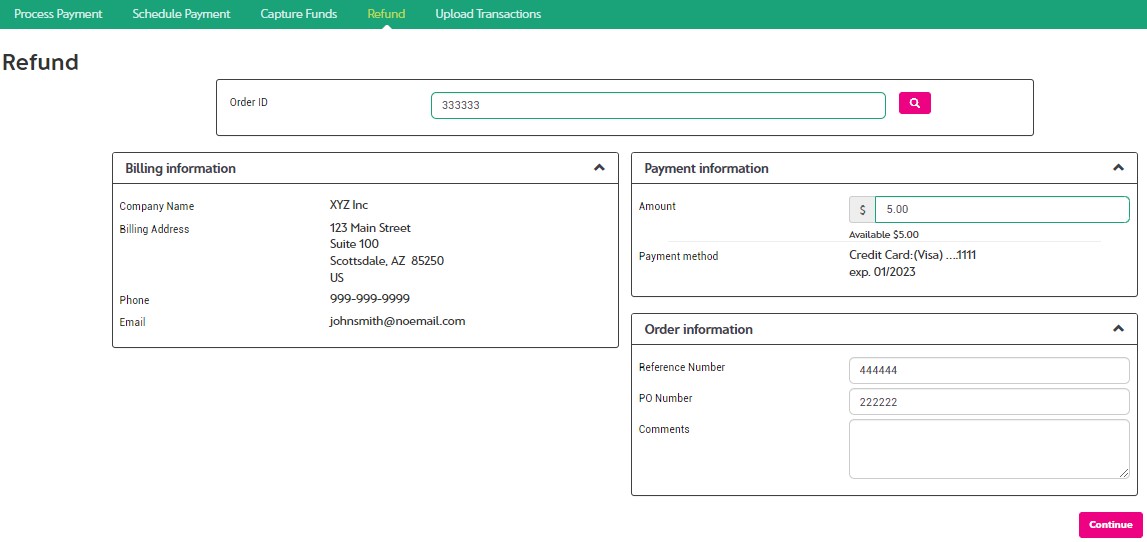
Flex Fee amounts cannot be refunded. Fees collected at the time a transaction was processed will be exluded from the amount available to refund to customers.
Processing A Credit
Use a Credit transaction when you need to perform a return against a transaction processed outside this system or when the original form of payment is no longer available to return funds to. We recommend that you use credit transactions sparingly, and limit access to this function to a few trusted employees.
- To perform a Credit, navigate to the Process a Payment page in the Payments section.
- Select Credit from the Transaction Type drop down.
- Complete the remaining fields as you would for any transaction.
- Click Continue and review the transaction on the Confirm page.
- Click Next to complete the transaction.
Reprinting A Customer Receipt
To reprint a customer receipt, locate the transaction in the Transactions Reports page in the Reports section.
Click on the Receipt icon in the Action column.
Complete the Printing job from your operating systems Print screen.
Voiding a Transaction
Voids are performed on Authorizations which have not been captured. To Reverse a Sale or a captured Auth, see the instructions in the Processing a Refund section of this Help Guide.
- Voids are performed on the Auths Ready To Capture page.
- Navigate to Auths Ready To Capture in the Reports section.
- Use the Dates settings and click Run Report to locate your transaction.
- Click the Void icon to initiate the Void, and confirm the void.
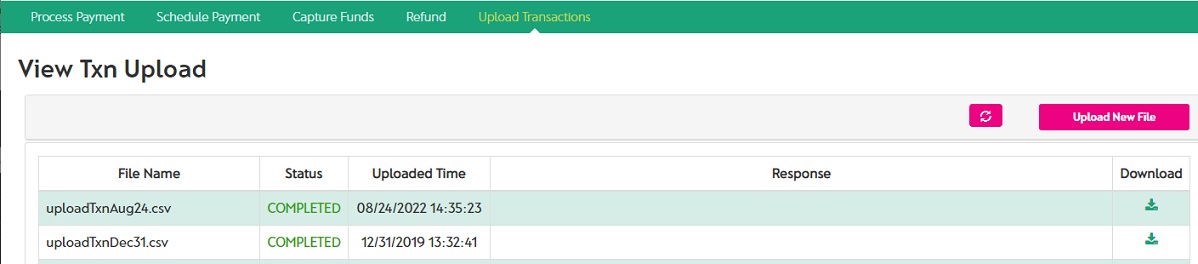
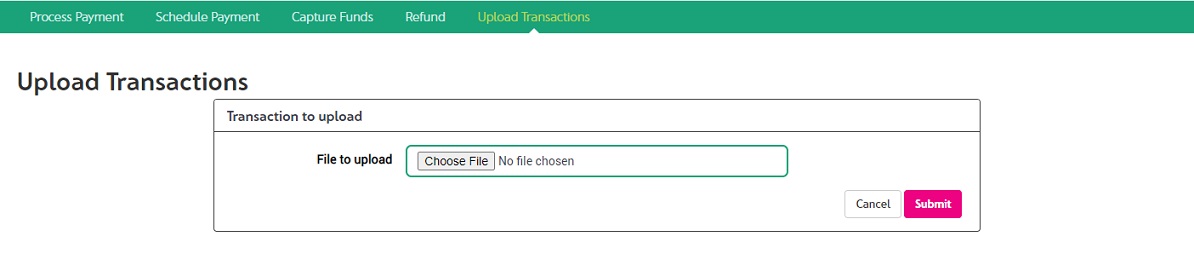
Uploading Transactions
Paymentsite will allow you to upload a set of transactions to process as a Batch. This can only be done using Payments On File because it is not secure to have card numbers in a file.
Preparing your transaction upload file
You can use Microsoft Excel or another similar spreadsheet program for preparing your customer information file. Ultimately the file must be in Comma Separated Value format (CSV) for successful upload and processing. Since the file format uses commas to separate fields, it is important not to use commas in your data.
Using one row per customer, enter the information into the file, populating each row with the following information for each customer (note that the header row can remain in the file):
| Column | Field Name | Required? | Example | Max Length | Possible Values / Description |
|---|---|---|---|---|---|
| A | Payment Type | R | credit | 16 | credit or ach |
| B | Transaction Type | R | sale | 16 | sale, credit, return |
| C | Order ID | O / **Required for Returns | 123 | 128 | 123-456 |
| D | Reference Number | O | 123456789 | 128 | |
| E | Customer ID | O | 123 | 64 | |
| F | Comments | O | abc 123 | 255 | This is a comment |
| G | Reserved for future use | N/A | N/A | N/A | N/A |
| H | Reserved for future use | N/A | N/A | N/A | N/A |
| I | Reserved for future use | N/A | N/A | N/A | N/A |
| J | Reserved for future use | N/A | N/A | N/A | N/A |
| K | ACH Check Number | O | 123 | 8 | 401 |
| L | Transaction Amount | R | 10.00 | 32 | 10.00 |
| M | Tax Amount | O | 3.00 | 32 | 1.67 |
| N | Shipping Amount | O | 3.00 | 32 | 3.50 |
| O | Billing Name | O | abc | 64 | Jean Smith |
| P | Billing Address 1 | O | 123 abc | 128 | 1 East Main Street |
| Q | Billing Address 2 | O | 123 abc | 128 | Suite 2b |
| R | Billing City | O | 123 abc | 64 | Roseville |
| S | Billing State | O | 123 abc | 64 | CA |
| T | Billing Zip | O | 123 abc | 16 | 12345 or S4S 1T1 |
| U | Billing Country | O | US | 64 | USA |
| V | Billing Phone | O | 123-456-789 | 32 | 123-456-789 |
| W | Billing Email | O | joe@joe.com | 128 | joe@joe.com |
| X | IP Address | O | 123.123.123.123 | 16 | 123.123.123.123 |
| Y | User ID | O | user123 | 128 | user123 |
| Z | Recurring Flag | O | 1 | 1 or blank | |
| AA | Ecommerce Indicator | O | 16 | eci | moto | retail | |
| AB | Payment Token | R | 100 | Token (from VPOS Card on File page) | |
| AC | Merchant ID | N/A | N/A | 64 | N/A |
| AD | Merchant Key | N/A | N/A | 64 | N/A |
| AE | ACH Effective Date | N/A | N/A | 10 | N/A |
| AF | Item Description | N/A | N/A | 100 | N/A |
| AG | Item Listing Priority | N/A | N/A | 8 | N/A |
The prepared file would look like this, with 3 transactions to be uploaded:

Save the file in CSV format. Then, to confirm the data is correct, you can open the CSV file in Notepad or any text editor, and it should look like this:


Flex Fee Program
To utilize the Flex Fee program, contact Agave Customer Support. Support will configure your account to automatically calculate fees for each transaction you process in the Merchant Portal. Fees may be percentage based or flat rate, and can be different for Credit Card transactions and ACH transactions.
Agave offers 2 models for Flex Fees in the Paymentsite Merchant Portal - One MID and Two MID. In the two MID model, all fees are processed using a separate Acquirer Merchant ID (MID) and funds are held apart from the primary Acquirer Merchant ID bank account. In the one MID model, all transaction amounts and fees are included in a single transaction.
Any fees configured for your account will be automatically calculated when you populate the Amount field on the payment page. The fee calculated is based on the preconfigured settings for your account.
The Confirmation Page displays a disclaimer which must be read to the customer and the customer must accept before the transaction is processed. A standard disclaimer is prepopulated and additional verbiage can be added under Settings in the merchant portal.
Receipts (both printed and emailed) will reflect the Flex Fee that applied to the customers transaction.
Refunds - Fees cannot be refunded. A refund performed on a transaction that included Flex Fees will only permit the base transaction amount to be refunded. This amount is automatically determined by the Paymentsite system based on the fee amount used when the original transaction was processed. Fees can be voided when a payment is voided but this must be done before the transaction has been picked up for settlement (times vary depending on Acquirer from withing 20 minutes of the Sale transaction to end of day times but are always same-day).
Reports - Transaction reports will reflect fees slightly differently depending on the Flex Fee model in use. If the two MID model is in use, the fee transactions will not appear in the transaction report. In the One MID model, the fees are included in the Amount and can be included as a separate column by including the Fee column. The base transaction amount is shown in the Subtotal column.
Scheduled Payments - Flex Fees configured for your account will be applied to any Recurring Payments schedules you set up. The fee configured for a given recurring payment schedule will remain static throughout the life of that schedule even if the fees configured on your account change. This is because the customer agrees to a specific fee rate at the time of the creation of the schedule.